Adding more insulation in your attic is an easy way to make your home more energy efficient as well as reduce the cost of your utility bills.
How attic insulation works
Attic insulation reduces heat loss in the winter and heat gain in the summer by providing a barrier between the attic space and the living space. The attic space is the coldest area of a house in the winter and conversely, it’s the hottest area in the summer. Heat will transfer from warm to cool objects until both objects become the same temperature. Therefore, heat transfers from living spaces to attics in the winter and from attics to living spaces in the summer. Heat transfers in the form of conduction, which transfers at a rate proportional to the differential temperature between the living space and the attic space.
Insulation has millions of tiny air pockets between its layers. These air pockets act to slow down conductive heat transfer through the insulation. Accordingly, insulation’s resistance to conductive heat transfer is measured in R-value. Attics with more insulation have a greater number of tiny air pockets which therefore increases the insulation R-value and effectiveness.
Attic preparation for attic insulation
There are a few attic preparation steps required before you purchase blown-in insulation bags and rent an insulation blowing machine. Following these preparation steps will increase efficiency and ensure longevity of roofing shingles.
Install attic rafter vents

Attic Rafter Vent
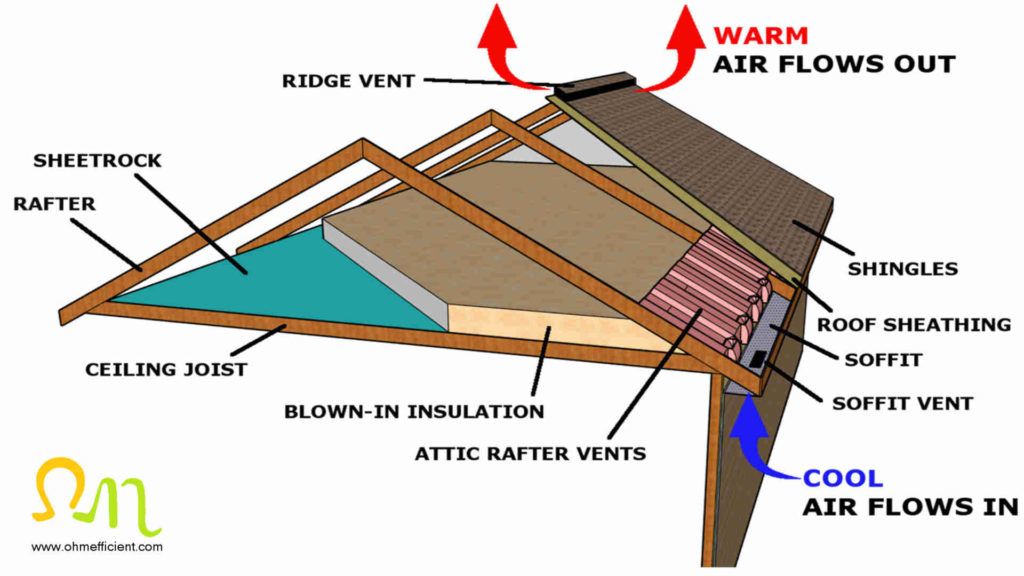
The integrated baffle means that no blocking material is needed between the vent and the top plate. Install between rafters to provide an unobstructed air channel through insulation to help keep air flowing freely from soffits to ridge vents.
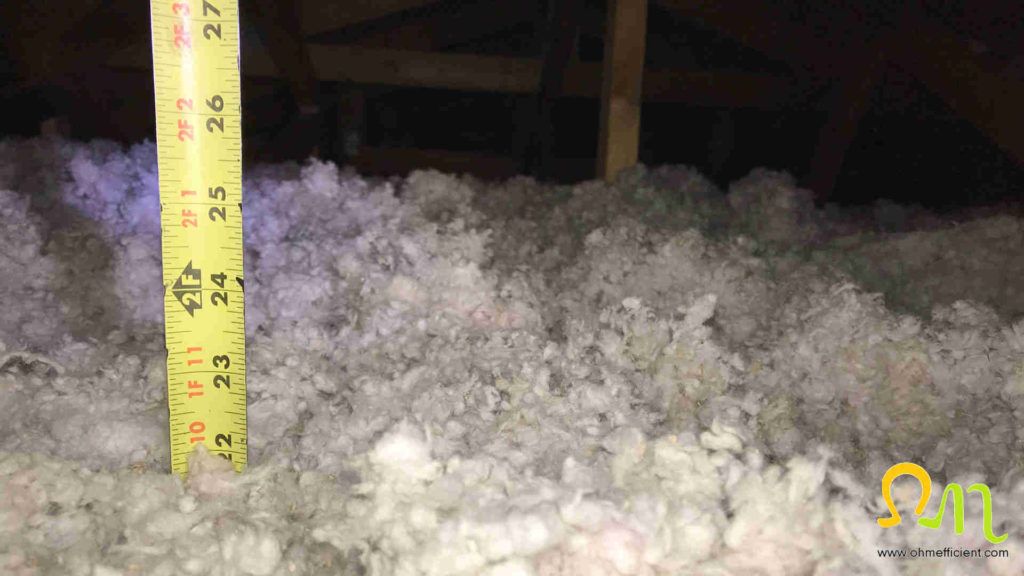
Installing attic rafter vents before blowing in 22 inches of insulation is extremely important! Proper attic ventilation is essential to both efficiency and shingle longevity. Proper ventilation allows outdoor air to flow through the soffit vents and the newly installed rafter vents and then out through the roof vents. If rafter vents are not installed, the new blown-in insulation will restrict air flow from the soffit vents to the roof vents and as a result, the attic space will heat up.
In the warmer summer months, proper attic ventilation keeps the temperature within the attic space lower. This in turn prolongs the shingle life as well as decreases heat conduction effects of warm attic air temperatures transferring to cooler living spaces. Proper attic ventilation reduces the living space cooling requirement as a result.
During the cool winter months, proper attic ventilation removes the warm, moist air that seeps into the attic from the living space below. It is important to remove moist air within the attic to prevent it from condensing on rafters and roof sheathing. Additionally, proper ventilation reduces the chance of rot and ice damming.
Apply insulating foam around all electrical boxes, wiring, ventilation fan housings, and plumbing vents
Insulation mainly restricts heat transfer from the conduction process. It also restricts heat transfer from the convective process; however, it does not do this effectively. Heat transfer from the convection process involves heat transfer by air movement.
During the cool winter months, warm air from the living space will move through openings like ceiling light electrical boxes and enter the attic space. Cool air will then enter the living space to replace the warm air that has exited. This is known as “stack effect” and it reduces efficiency. Conversely, in the warm summer months, this same process occurs in reverse. Warm air from the attic will move through these openings and enter the living space.
Applying air tight insulating foam around openings between the living space and the attic helps to prevent heat transfer from the convection process. This further reduces the chance of rot and ice damming and also increases efficiency.
Note
Do not apply insulating foam inside of electrical boxes. Electrical and fire codes do not permit applying insulating foam inside of electrical boxes.
Install vapor barriers on recessed lighting
Installing vapor barriers over recessed lighting is important for two reasons. First, many recessed light housings are not rated for direct contact with insulation. Placing a vapor barrier over the recessed light prevents direct contact with insulation. Second, a properly installed vapor barrier is air tight, which therefore prevents heat transfer from the convection process.
Attic insulation blown-in installation
The following installation calculations and instructions are for using Owens Corning blown-in fiberglass insulation. There are many insulation materials to choose from with the two most popular choices being fiberglass and cellulose. I believe fiberglass to be the better insulation choice because it does not settle as it ages and therefore keeps its R-value over time. I have been in attics where the old cellulose insulation has settled/compacted and as a result, it could be picked up in small sections. Once the insulation has compacted, it has less tiny air pockets and its R-value decreases.
Owens Corning Blown-in Fiberglass Insulation
The attic is one of the easiest places to add insulation to improve the comfort and energy efficiency of your home. AttiCat Expanding Blown-In Insulation is designed for your attic insulation project in new or existing homes.
Step 1
Calculate how many bags of blown-in insulation are required
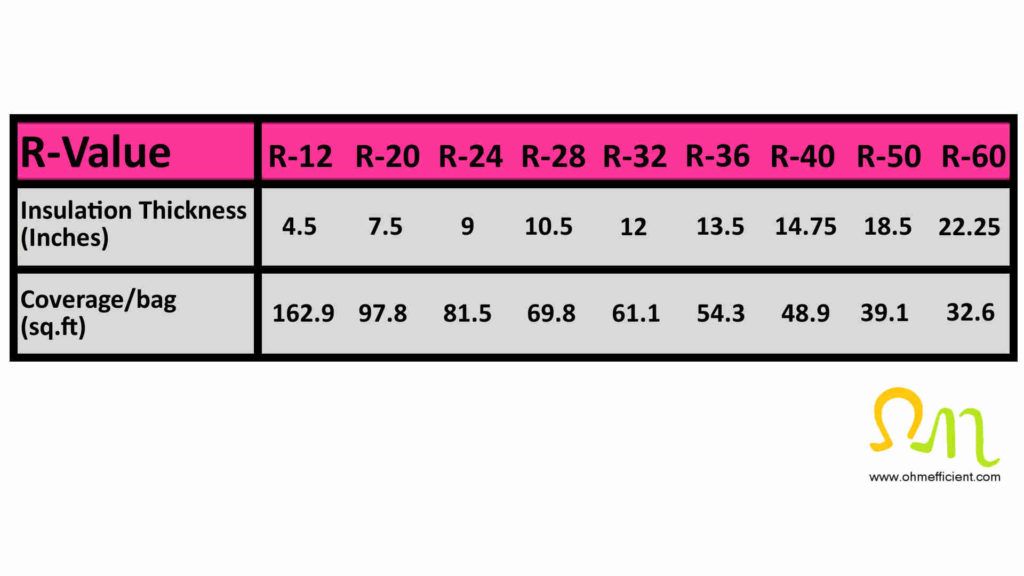
First, you need to determine the square footage of your attic space as well as the desired R-value you want to achieve. Then use the table below to determine how many bags of Owens Corning blown-in insulation you need to add to your attic.

Example 1
To achieve an R-value of 60, a new 1000 square foot attic would need 22.25 inches of insulation.
= 1000 sq. ft. / 32.6 sq. ft. per bag
= 30.7 bags
31 bags of insulation would therefore achieve an R-value of 60 for this example.
Example 2
If the 1000 square foot attic previously had 9 inches (R-24) of insulation, to achieve an R-value of 60, you would need an additional 13.25 inches (~R36) of insulation.
= 1000 sq. ft. / 54.3 sq. ft. per bag
= 18.4 bags
An additional 19 bags of insulation would therefore achieve an R-value of 60.
Step 2
Purchase blown-in insulation and rent an insulation blower
Purchase as many bags of insulation as required and then have it delivered/shipped to your home or business. Once the insulation has been delivered, call a local tool rental company in your area and rent an insulation blower.
Step 3
Safety equipment
Wear a NIOSH- or MSHA- approved face mask such as the 3M 8210 (8271 for high humidity environments) while working in the attic. Wear gloves, eye protection, pants, as well as a long sleeve shirt to minimize skin contact with the insulation.
Conclusion
To maintain a living space temperature, heating systems operate to replace the heat transferred out during the winter, and cooling systems operate to remove the heat transferred in during the summer. Insulation slows down the heat transfer process, allowing living spaces to maintain a desired temperature while operating either the heating or cooling system less often.
Once you insulate or upgrade the insulation levels within your attic, you will consume less energy. As a result, there will be fewer emissions of greenhouse gases because less fossil fuels are consumed. According to North American Insulation Manufactures Association (NAIMA), a 30% reduction in carbon dioxide emissions could be achieved if all U.S. residential buildings improved their insulation levels.
Parts and tools required
Blown-in fiberglass Insulation
Fiberglass insulation blower (rental)
Attic rafter vents
Insulating foam
3M 8210 face mask
Eye Protection
Tape measure
References
[1] North American Insulation Manufactures Association. (1996). Energy Efficiency through Insulation: The Impact on Global Climate Change [PDF file] Author. Retrieved form https://insulationinstitute.org/wp-content/uploads/2016/02/NAIMA024.pdf
Related content
Perforated radiant barriers enhance attic insulation in cold climates
Radiant Barriers Lower Air Conditioning Costs
Cool Roofs Reduce Air Conditioning Costs


