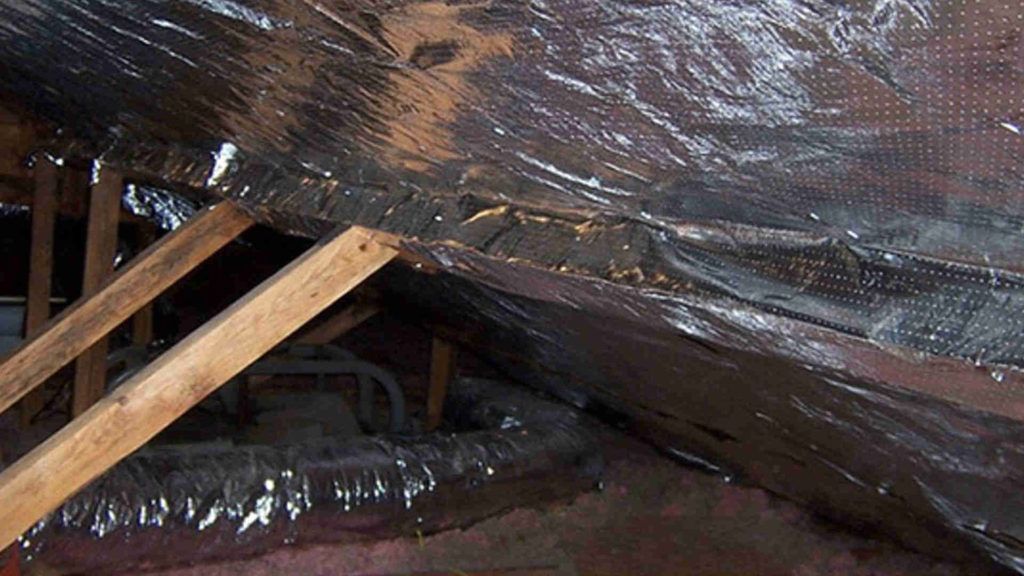
Stapling radiant barrier foil to the bottom of attic roof rafters improves the thermal performance of attic insulation in hot climates. Radiant barriers reduce radiant heat gain, which results in lower air conditioning requirements as well as energy savings.
Radiant heat transfer
Everything with a temperature greater than 0oK emits radiant heat. Radiant heat primarily transfers by either electromagnetic, infrared or UV waves. Other objects either absorb or reflect these radiant waves. If the waves reflect off an object, they will continue to travel until another object absorbs them. Radiant heat transfer, unlike conductive heat transfer, does not require direct contact for heat transfer to take place. One prominent example of radiant heat transfer would be to place your hand near a lit candle. Your hand absorbs the radiant heat that transfers through the air from the candles flame.
How radiant barriers work
Radiant barriers are usually made of aluminum because it is a cost effective material that has a high reflectivity and low emissivity. Percentage values are used to represent a materials reflectivity and emissivity. Aluminum typically has a reflectivity of 97% and an emissivity of 3%. This means that 97% of the radiant heat directed at a piece of aluminum reflects away from the aluminum. The radiant heat reflected from aluminum will eventually absorb into some other non reflective object. Aluminum’s emissivity rating of 3% represents the aluminum’s ability to transfer its heat in the form of radiation.
Since emissivity is a little more intricate to understand, we will use another example similar to the hand and candle one used previously. This time, replace the candle with a piece of aluminum heated to 200oF. When you place your hand near the heated aluminum, only 3% or 6oF of its radiant heat absorbs into your hand. However, if you were to touch the piece of aluminum, the full 200oF would transfer to your hand via conduction.
To demonstrate how radiant barriers work, we can continue with the hand and candle example, with the addition of a piece of aluminum foil. This time the radiant heat from the candles flame transfers through the air and 97% of it reflects back towards the candle rather than your hand. In hot climates, this theory holds true. Radiant heat from the building’s roof reflects back towards the roof rather than absorbing into the attic insulation.
Radiant Barrier
Designed to reduce heat transfer and improve energy efficiency. It works by reflecting radiant heat away, keeping the attic and the rooms below cooler, helping to reduce air conditioning costs and make indoor temperatures more comfortable.
Benefits of radiant barriers in hot climates
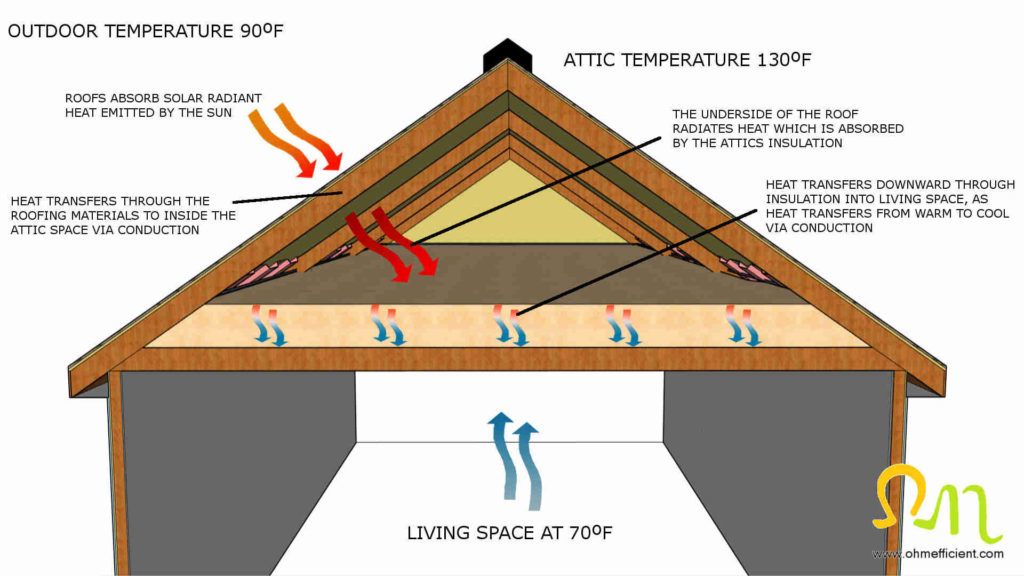
Roofs absorb solar radiant heat emitted by the sun. This absorbed heat transfers through the roofing materials to inside the attic space via conduction. The underside of the roof, then radiates heat, which is absorbed by the attic insulation. This process causes the attic space to warm up. The attic insulation top surface temperature increases due to the absorbed radiant heat. Since heat transfers from warm to cool objects via conduction, this heat works its way down into the living space. This results in either the air conditioning operating more often or the living space to become uncomfortable. It is worth mentioning that attic ventilation does not cool down radiant heat transfer as air does not absorb radiation.
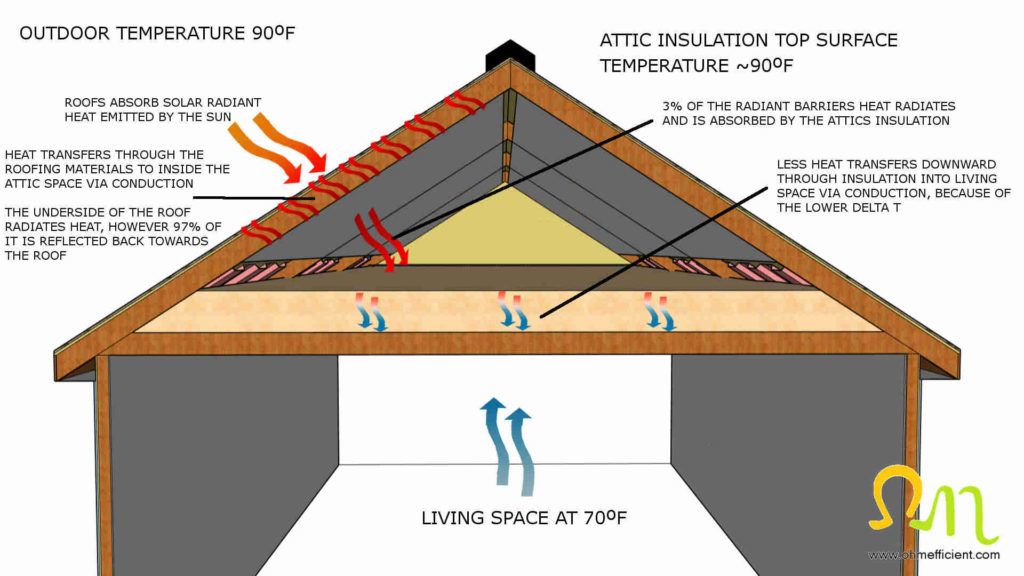
The addition of stapling a radiant barrier to the bottom of attic roof rafters will keep the attic insulation cooler. The radiant heat from the roof reflects back rather than the insulation absorbing it. The top surface temperature of the attic insulation therefore remains close to ambient outdoor temperature. The degree to which conductive heat transfers into the living space reduces because the differential temperature between the living space and attic insulation is less. The rate that conductive heat transfers is proportional to the differential temperature “Delta T” of the attic insulation and the living space. Conductive heat transfer is minimized when the difference in attic insulation temperature and living space temperature is small. This results in either the air conditioning operating less frequently or the living space to become more comfortable.
Why radiant barriers require an open air space on one side
The requirement for an open air space on one side of the radiant barrier prevents heat transfer via conduction.
A lot of people ask if installing a radiant barrier between roofing shingles and roof decking would provide the same benefit. People asking this question are usually either shingling or re-shingling their roofs. In this situation, they are hoping for a faster radiant barrier installation during the shingling process. Unfortunately, installing a radiant barrier between roofing materials and roof decking does not provide the open air space and therefore it does not work. In this case, heat absorbed by the shingles would conduct through the radiant barrier and into the roof decking. Consequently, the underside of the roof radiates heat, which then absorbs into the attic insulation.
Radiant barrier sheathing
Radiant barrier sheathing is a roofing material where the radiant barrier is installed directly onto one side of the sheathing during the manufacturing process. The radiant barrier side of the sheathing faces down into the attic space. The radiant heat absorbed by the shingles, conducts through the radiant barrier sheathing. When the other side of the radiant barrier sheathing is open to air, the low emissivity properties limit heat transfer by radiation to 3%. The open air space prevents heat transfer by conduction.
The combination of radiant barriers low emissivity properties as well as the open air space greatly reduces the attic insulation top surface temperature.
How to install radiant barriers
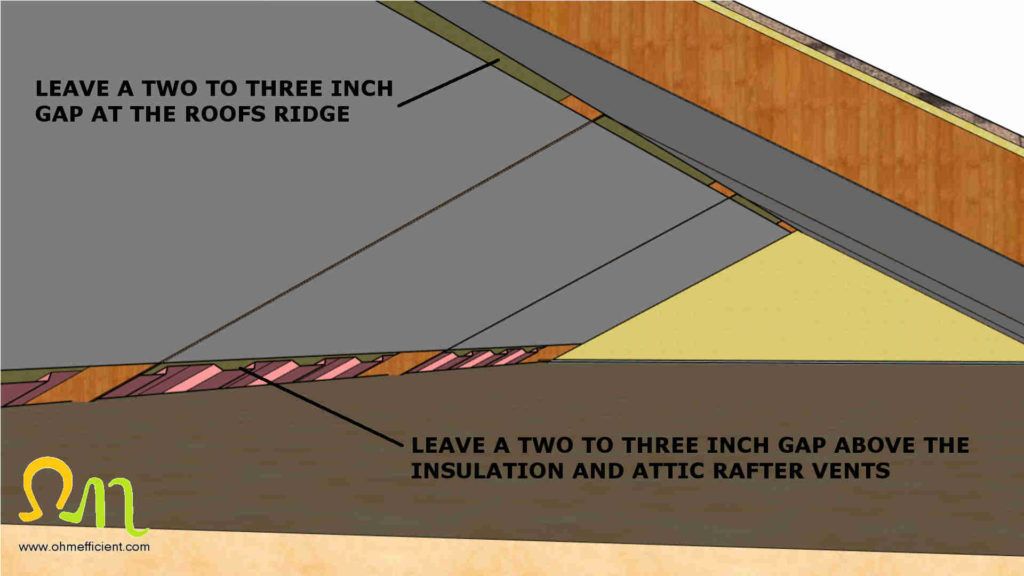
Start installing the radiant barrier by stapling the first row at the bottom, closest to the attic rafter vents. Leave a two to three inch gap above the insulation and attic rafter vents. Leaving a small gap at the bottom allows for air that enters the attic to proceed to the exhaust vent by either flowing into the attic space directly or in between the radiant barrier and the roof deck.
Once the first row of radiant barrier is complete, work your way up to the roof ridge by overlapping the second row by one or two inches. Aluminum HVAC foil tape can be used at the seams for esthetic purposes to make the installation look more professional. However, there is no efficiency benefit of using the aluminum HVAC foil tape.
Additionally, there must be a two to three inch gap at the top of the roof ridge where no radiant barrier is installed. The top of the attic is where warm air collects. The two or three inch gap at the ridge allows for this warm air to flow freely and make its way out the exhaust vents.
Additional requirements when installing radiant barriers
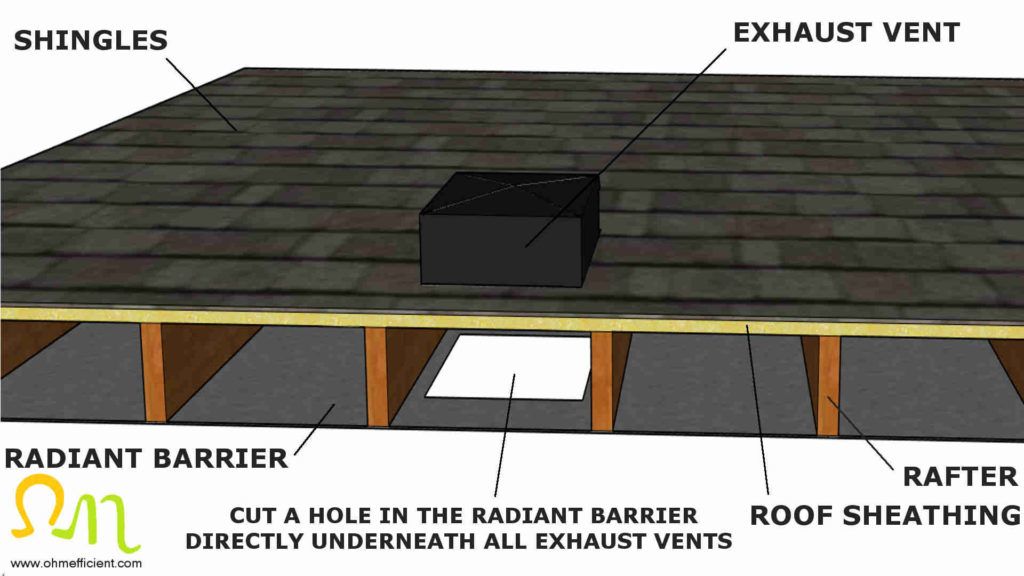
Exhaust vents
Warm attic air exits the attic space through exhaust vents. These exhaust vents come in various forms, ranging from static vents, wind turbines, fan vents, ridge vents, ventilators, as well as gable vents. No matter the type of exhaust vent, a corresponding hole needs to be cut in the radiant barrier directly below the exhaust vent.
Attic rafter blocking
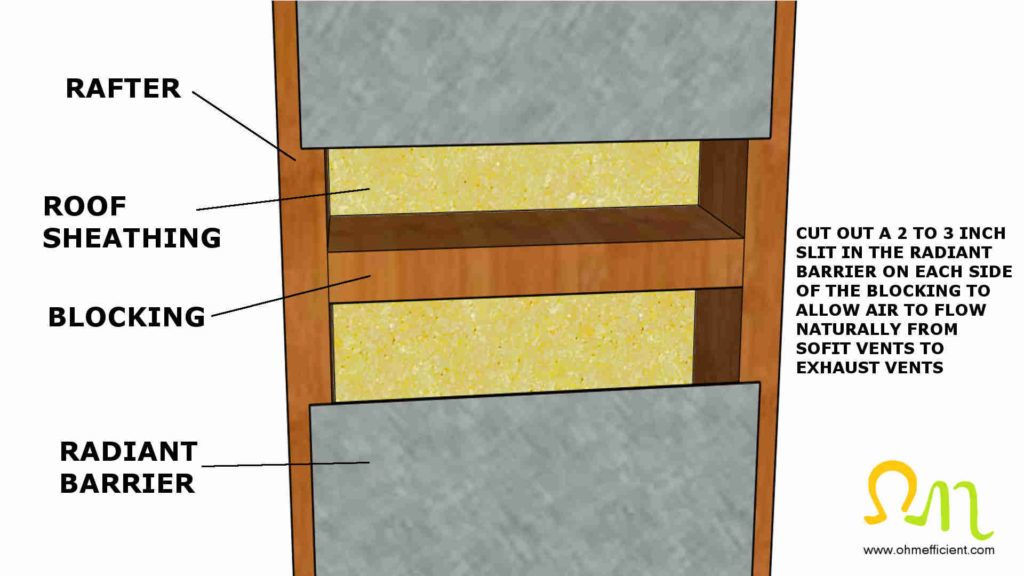
When a piece of wood is installed perpendicularly between two rafters, the piece of wood is referred to as blocking. Blocking is used to increase rafter stability to the roof framing. If radiant barrier is installed directly over the blocking, the radiant barrier essentially dead-ends the airflow between the two rafters.
For maximum attic efficiency and to prolong the life of the roofing material, never obstruct airflow.
There are two installation options, allowing for air to flow around the attic rafter blocking and radiant barrier. One option is to cut a two to three inch slit in the radiant barrier on each side of the blocking. The other option is to droop the radiant barrier beneath the blocking, allowing air to flow beneath the blocking and above the radiant barrier.
Attic hip and valleys
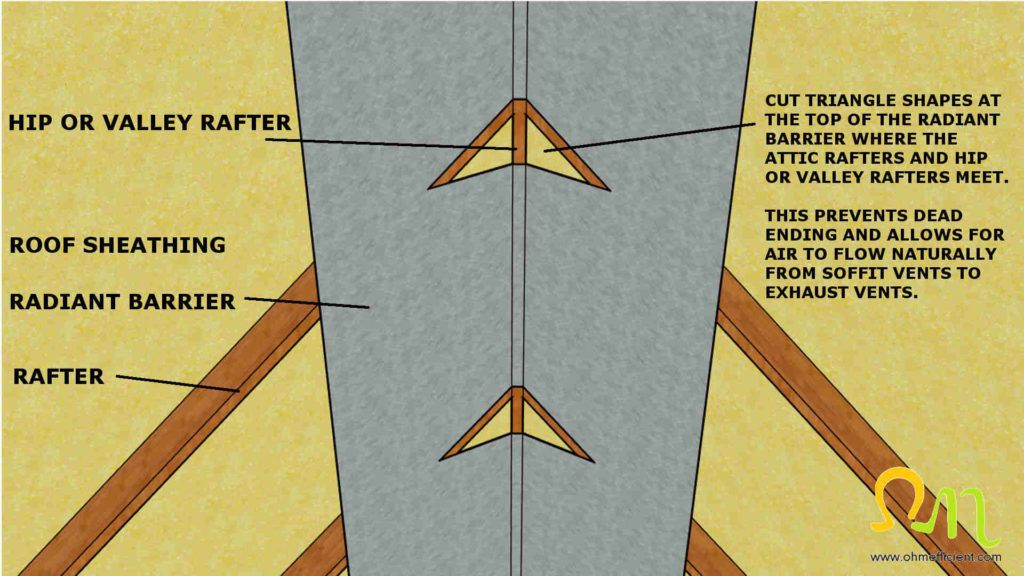
When referring to an attic, a hip is an exterior corner where both sides of the roof slope down towards adjacent walls. A valley is an interior corner where two roof slopes meet, usually on L-shaped houses. Attic rafter’s dead end into either hip or valley rafters. Installing radiant barrier continuously over hip or valley rafters will dead end airflow. To prevent dead-ending airflow, simply cut triangle shapes in the radiant barrier at the top where the attic rafters and hip or valley rafters meet.
Radiant barrier energy savings
The U.S. Department of Energy, Florida Solar Energy Center and Oak Ridge National Laboratory have all analyzed radiant barriers regarding energy saving potential. The amount of energy savings radiant barriers provide varies on multiple aspects from home construction, location, and occupant lifestyle. The results of their studies indicate that a 5 to 12% cooling cost energy savings can be achieved in warm and sunny climates.
Conclusion
Radiant barriers reduce downward heat gain transferred from the attic into the living space. As a result, the reduced heat gain correlates to reduced air conditioning cooling costs. It is important to realize that radiant barriers work in conjunction with attic insulation; it is not a direct replacement for attic insulation. Insulation works to reduce the rate of conductive heat transfer as the ambient temperature is higher than the living space temperature.
Tools & parts required
Radiant Barrier
Utility Knife
Staple Gun that uses T50 Staples
3/8 inch Staples
Half Faced Respirator with a P100 Filter
Clamp Lights
Extension Cord
Measuring Tape
HVAC Aluminum Foil Tape (for esthetics only)
2×6 Boards (to place down and walk on)
References
U.S. Department of Energy. (n.d.). Retrieved from https://www.energy.gov/energysaver/weatherize/insulation/radiant-barriers
Florida Solar Energy Center. (n.d.). Retrieved from www.fsec.ucf.edu/en/publications/html/FSEC-EN-15/index.htm
Oak Ridge National Laboratory. (n.d.). Retrieved from https:web.ornl.gov/sci/buildings/tools/radiant/
Related articles
Cool Roofs Reduce Air Conditioning Costs
How to install blown-in attic insulation
Perforated radiant barriers enhance attic insulation in cold climates

