This article describes how to measure and mitigate radon levels within your home. The two most commonly used methods for radon mitigation include Active Soil Depressurization “ASD” and Passive Soil Depressurization “PSD”. This article will also discuss how to perform the pressure field extension test required for Active Soil Depressurization arrangements. This test is also referred to as the communication test. Additionally, this article will discuss how to properly select a radon fan from the pressure and flow test results.
About radon
Radon is a colorless, odorless gas that derives from the radioactive decay of uranium. Varying traces of uranium are found in the soils and rocks throughout the globe. Radon is therefore not isolated to certain areas of the world. Radon makes its way to the earth’s surface by travelling through small openings and cracks in the earth’s crust. Once it reaches the earth’s surface, it becomes diluted into the atmosphere and is usually not a concern. When radon gas comes into contact with a building foundation, it can enter the building. Radon levels can accumulate within a building to a level that can cause health concerns.
The health concern regarding breathing air that contains radon gas is the increased risk of developing lung cancer. Lung cancer risks increase when either the concentration or length of exposure to radon gas increases. According to the American Cancer Society, radon is the number one cause of lung cancer amongst non-smokers.
How radon enters buildings
There are numerous entry points for radon gas to enter a building. The amount of entry points will vary depending on the construction of the building. Cracks in concrete floors and basement walls are the most common entry points. Sump pump pits, porous hollow-block basement walls, dirt floors in cold rooms, as well as floor drains are more examples of radon entry points.
Air tight building construction or renovation, can increase the rate to which radon enters the building. The increase in radon entry rate occurs if the building HVAC system creates a negative pressure within the building. If the HVAC system creates a negative pressure, the air pressure inside the building is lower than the air pressure outside and underneath the building. This pressure difference pulls outside air into the building from various openings including the radon entry points.
Appliances can increase radon levels within a building
The air pressure within a building can become negative by operating appliances such as: bathroom / range hood exhaust fans, furnaces, hot water tanks, clothes dryers and non-sealed HVAC ducts. Exhaust fans with high CFM flow rates can create negative pressures within a building if they run for extended periods. Furnaces exhaust hot combustion air from buildings while receiving a mixture of outdoor and indoor air from cold air returns. If this mixture of indoor and outdoor air is incorrect, it can also result in negative pressures within the building.
Hot water tanks also exhaust hot combustion air from buildings, however, they only use indoor air for combustion. As a result, a slight negative pressure occurs during operation. Additionally, conventional clothes dryers act as an exhaust fan that typically draw around 100-125 CFM of air while operating. Refer to our Energy efficient heat pump dryer article, for a vent less clothes dryer alternative that does not create negative building pressure while operating. Leaky HVAC ducts also cause poor air distribution and air pressure problems as air takes the path of least resistance, causing air balance issues. Refer to our Duct Sealing Improves HVAC System Efficiency article for more information.
Continuous radon monitoring
The amount of radon that enters a building depends on the building construction and the soil composition surrounding the building. Other factors such as atmospheric pressure, temperature, wind, as well as shifting soil will cause the levels of radon within a building to fluctuate.
Since radon levels fluctuate, it’s important to continuously monitor how much radon is in the air that we breathe. Trending these radon levels allows for the fluctuations to be captured. Additionally, trends give you a better understanding of your overall exposure to radon. Smart radon detectors with Bluetooth communication easily enables trending of radon levels.


Traditional short term measurements of radon levels can be misleading. They can be misleading because radon levels are, typically, but not always, lower in the summer compared to the winter. If a short term measurement was taken during the summer, you may be misled to believe that the radon levels within a building are acceptable. Alternatively, if the measurement was taken during the winter, you may be misled to believe that radon levels are worse than they actually are. Since the health effects of radon depend on the level of radon and your exposure to it over time, it is wise to continuously monitor and trend radon levels.
Radon levels: How much is too much?
There are two units of measure for radon within a specific space. The global unit of measure used globally is the Becquerel’s per meter cubed (Bq/m3). The unit of measure used within the United States is the pico Curie per liter (pCi/L).
In 2009, the World Health Organization (WHO) published the WHO Handbook for indoor radon. This handbook proposes a radon reference level of 100 Bq/m3. 100 Bq/m3 equates to 2.7 pCi/L for those who reside in the United States. Keeping radon levels below this reference level minimizes health hazards. If radon levels exceed this reference level, WHO recommends remediation action be taken to reduce indoor radon exposure.
If the measurements from the smart radon detector trend a radon level of:
0-48 Bq/m3 (0-1.3 pCi/L)
This is below the reference level and therefore does not require any radon mitigation.
49-99 Bq/m3 (1.32-2.68 pCi/L)
This is also below the reference level. You can experiment with sealing foundation cracks as well as make adjustments to ventilation to reduce radon levels.


100-149 Bq/m3 (2.7-4 pCi/L)
If these levels of radon are maintained for more than a few months, radon mitigation is recommended. A passive soil depressurization system may be able to lower these levels below the WHO reference level; depending on the height of the building as well as the permeability of the fill material beneath the concrete slab.
Greater than 150 Bq/m3: (> 4.05 pCi/L)
If these levels of radon are maintained for more one month, radon mitigation is recommended. Higher levels of radon present, typically require an active soil depressurization system to lower radon levels below the WHO reference level.
Radon mitigation
Active soil depressurization “ASD” and passive soil depressurization “PSD” are the two most common methods of radon mitigation. Both methods work by reducing the air pressure beneath the concrete slab while exhausting the radon gases to the atmosphere. This essentially reverses the air pressure balance above and below the slab. After radon mitigation is in place, air drawn into the building comes from either ventilation equipment or building envelope leakage. Radon latent air is no longer drawn from beneath the slab into the building.
Warning!
Cracks in the concrete slab can result in airflow from within the building to beneath the slab, after radon mitigation is in place. Shifting of the concrete slab that results in cracks, as well as gaps around the perimeter of floating slabs allows this airflow. There is a potential for back pressure that can adversely affect fuel burning appliances as a result.
Test to confirm this back pressure does not result in back-drafting of fuel burning appliances. With the radon mitigation fan operating, use a smoke pen and turn on each appliance (furnace, hot water tank, etc.) to ensure the smoke goes up the appliance exhaust vent. Additionally, install a continuous carbon monoxide detector on each floor of the building.
Active Soil Depressurization
Installing radon mitigation using active soil depressurization includes connecting a radon exhaust fan and PVC piping from below the concrete slab to outside the building. The fan draws in radon containing air from beneath the building and exhausts it outdoors through the PVC piping.
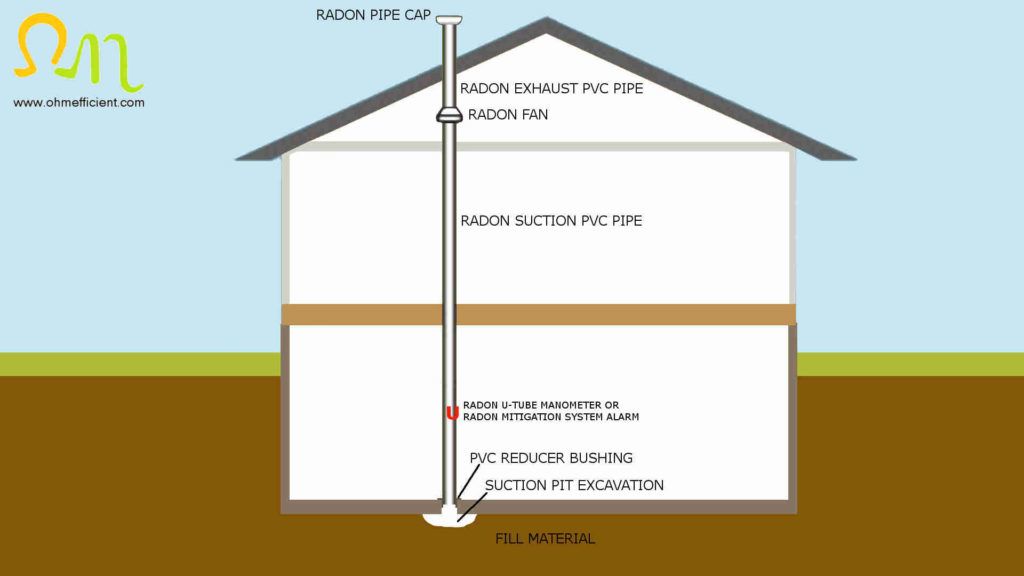
To do this, core a hole into the concrete slab, usually in an accessible and concealed utility room or closet. Remove some of the fill material underneath the slab to form a pit to increase the surface area of the hole. Then insert the PVC pipe into the hole and use urethane caulking to seal between the PVC pipe and concrete. In warm climates, the PVC pipe, then routes upward to the attic and vents through the roof. The radon exhaust fan is typically installed in the attic space. Alternatively, route the PVC piping through the side of a building to an outdoor rated fan where more PVC piping continues to route the exhaust above the highest roof line.
Note
Depending on the permeability of the fill material under the slab, more than one PVC suction pipe may be required. When the permeability is low, the radon gas does not flow underneath the slab easily. Refer to the pressure field extension test “communication test” section below.
Active Soil Depressurization alternate geometry
Installing a radon exhaust fan in an unconditioned attic space or outdoors may not be suitable for countries that experience extremely low temperatures. Installing an ASD system according to the U.S. Environmental Protection Agency (U.S. EPA) recommendations may result in a radon exhaust fan that does not function. The extreme temperature and weather variations can cause fan operation issues and possible blockage of the exhaust from ice and snow. Many countries have developed an alternative geometry from the U.S. EPA recommendations for this reason.
The alternative geometry consists of installing the radon exhaust fan indoors and routing the exhaust out the side of the building, near ground level. Avoid placing the exhaust within one to two meters (3.3 to 6.6 feet) from high use outdoor spaces, such as decks or patios. Additionally, to prevent the radon exhaust air from re-entering the building, the location for the exhaust point needs to be chosen correctly. The exhaust should also be kept away from fresh air intakes used for furnace or heat recovery ventilators (HRV’s) as well as windows and doors.
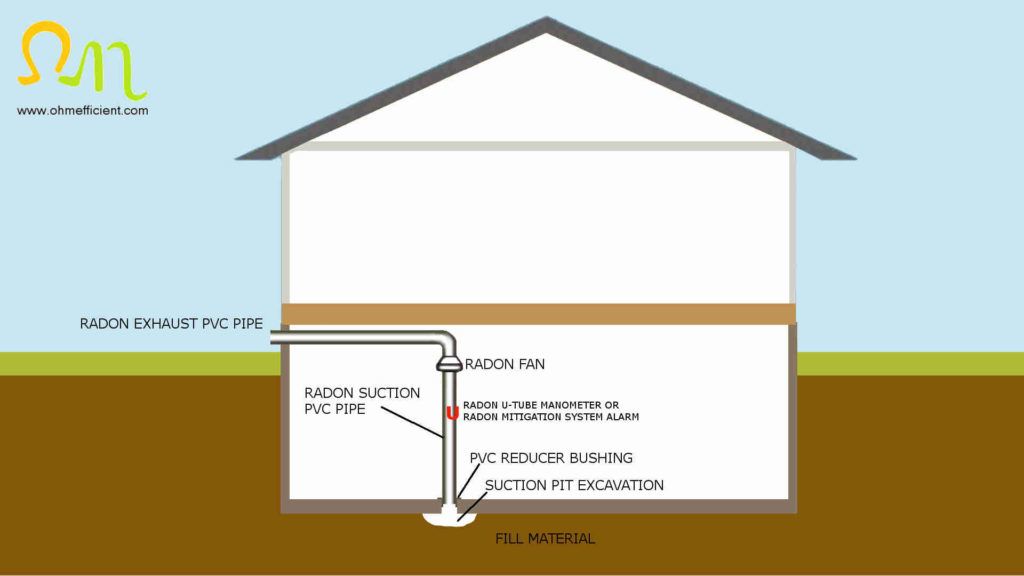
Radon dissipates into the atmosphere
Research from the radon group at Health Canada shows how rapidly radon levels dissipate into the atmosphere from the alternative geometry installation. The research measured radon levels falling from thousands of Bq/m3 to less than 200 Bq/m3 within 1 to 2 meters (3.3 to 6.6 feet). The study also compared radon dissipation at varying distances based on the radon exhaust fan flow rate. Radon exhaust fans with higher flow rates were able to push higher radon levels further from the building.
Note
Early models of radon exhaust fans were not sealed well. Installing these early model fans within a buildings occupied space, could result in leaks and potentially increase the levels of radon within the building. New radon exhaust fans have better seals which limits this potential hazard. Radon levels can increase if a leak were to occur from the exhaust fan or anywhere along the suction or exhaust PVC piping within the building. Therefore, it is important to continue monitoring radon levels within a building after a radon mitigation system has been installed. Radon detectors should be treated similar to other life safety equipment such as fire and carbon monoxide detectors.
Passive Soil Depressurization
Passive soil depressurization has a similar layout as the active soil depressurization system with the exception that no radon exhaust fan is used. Instead, the system relies on the stack effect to draw the radon gas through the PVC pipe and exhaust it outdoors. Stack effect occurs when higher pressure warm air draws in the low pressure cool air. Note: Using air temperature and pressure to create air movement is more effective in building with more height. Passive soil depressurization is not suitable for single story buildings as the stack effect is less pronounced.
Pressure field extension also known as communication test
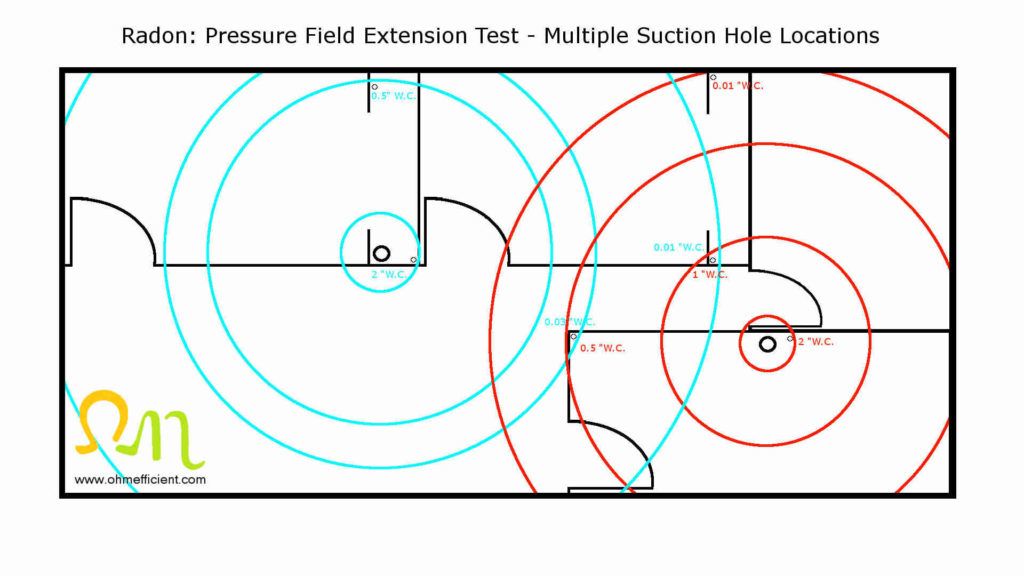
The pressure field extension test determines the effective depressurization radius that a radon mitigation fan can provide. The test helps determine the location as well as the number of suction holes required to effectively mitigate radon.
If the fill material beneath a concrete slab is gravel, the permeability will likely be high which means radon gas can easily flow through it. If the fill material is soil, the permeability may be lower, especially if the soil is compact or moist. When the permeability of the fill material is low, more radon suction holes may be required. If more radon suction holes are required, the suction holes need to be positioned according to the results from the pressure field extension test.
The following steps explain how to perform the pressure field extension test to determine the coverage from a particular suction point.
Step 1
Determine drilling sites
Pick a centrally located area of the concrete slab for the drilling site. Pick an area that is accessible and concealed, typically in a closet or utility room. Determine the most likely routes for water, sewer, gas or other utility lines that could be beneath the slab. Avoid picking a site that could potentially be on the route of any of these services. For example, don’t pick a drill site next to a floor drain or beside a water meter.
Step 2
Drill a suction hole through the concrete slab
Insert a masonry coring bit slightly larger than the diameter of the vacuum nozzle into a hammer drill and drill a suction hole through the concrete slab. The hole should be located between 6 and 15 feet from the nearest exterior wall. For tests that require more than one suction hole, drill the suction holes approximately 30 feet apart from one another. The masonry coring bit needs to go completely through the concrete and into the fill material below. Ensure you proceed drilling slowly while feeling for any obstruction below the slab.
Step 3
Drill pressure sampling holes through the concrete slab
Insert a 3/8 inch impact drill bit into the hammer drill and drill pressure sampling holes approximately 3, 9 and 15 feet away from the suction hole. Drill these pressure sample holes into the concrete slab in various directions from the suction hole.
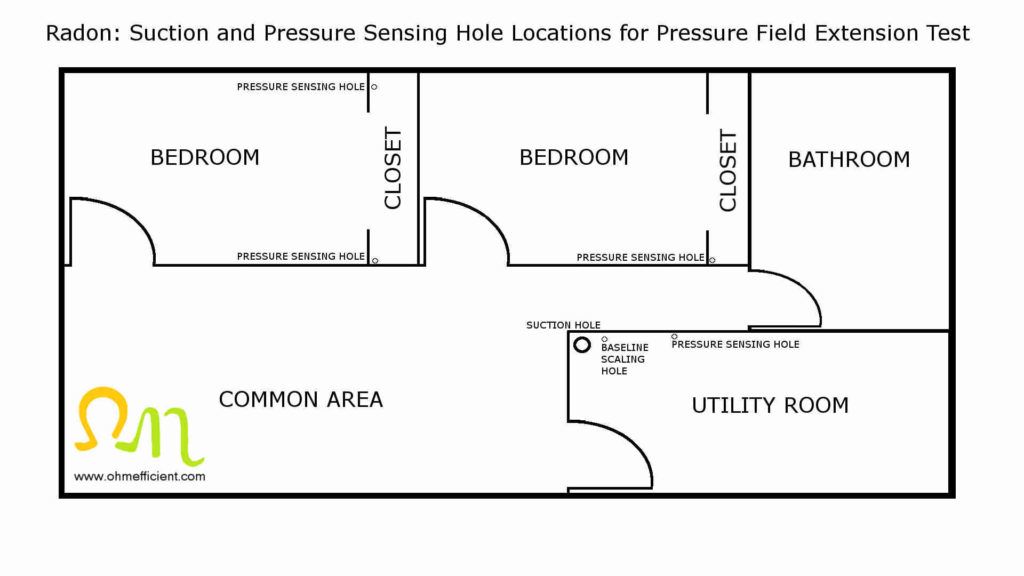
Step 4
Measure the natural depressurization and the normal appliance depressurization
Use a micromanometer to measure the natural/normal depressurization at each of the pressure sampling holes. Insert the tube from the micromanometer into a pressure sensing hole and then use a duct sealing compound to create an air tight connection around it. Additionally, seal all other pressure sensing and suction holes temporarily with the duct sealing compound. Measure and record the pressure from each sensing hole with and without appliances (furnace, hot water tank, exhaust fan) operating. The highest pressure recorded during this step will be used later to determine the effective radius of extension of the pressure field.


Step 5
Drill a baseline scaling hole through the concrete slab
Drill another 3/8 inch hole, one foot away from the suction hole. This baseline scaling hole is used to set up the pressure field extension test operating parameters.
Step 6
Insert the vacuum nozzle into the suction hole
Insert the vacuum cleaner nozzle into the suction hole and then use a the duct sealing compound to create an air tight seal around the nozzle.
Note
The vacuum cleaner used for this pressure field extension test needs to capable of 100 CFM at 80 “W.C. Suction pressure (“W.C.) and airflow (CFM) are the characteristics of vacuums which allows them to pick up and transfer debris down a hose. Suction picks up the debris whereas airflow transfers the debris. To achieve the 100 CFM at 80”W.C. requirement, use a portable commercial grade vacuum with two series impellers. Note: High speed/horsepower portable shop vacuums can achieve the airflow requirements, however, they do not meet the suction pressure requirement. These vacuums typically operate around 120-150 CFM and 60”W.C.


Step 7
Insert the micromanometer into the baseline scaling hole
Insert and seal the tube from the micromanometer into a baseline scaling hole. Temporarily seal pressure sensing holes with the duct sealing compound.
Step 8
Adjust the vacuum speed to change the pressure at the baseline scaling hole
Turn on and adjust the vacuum cleaner’s speed by plugging the vacuum cleaner into an inexpensive series connected rheostat. Continue to adjust the speed until the pressure reading on the micromanometer at the baseline scaling hole is between 1.5 and 2”W.C. The series connected rheostat changes the supply voltage to the vacuum cleaner induction motor and varies the electromagnetic torque developed by the motor. This is an inefficient but cost effective way to vary the motor speed of the vacuum cleaner. It is inefficient because a substantial amount of power dissipates across the rheostat and is wasted as heat. Since this form of motor speed control is only for testing proposes, it is suitable for this application.


Step 9
Measure pressures at each sampling hole while the vacuum is operating
While the vacuum is operating, remove the micromanometer from the baseline scaling hole and seal the hole with the duct sealing compound. Start measuring the pressures at the sensing holes. Start with the sensing hole closest to the suction hole and working your way out.
Note
The pressure readings at the sensing holes closest to the suction hole will be higher and continue to decrease as you move further away from the suction hole. In soils with low permeability, it is important to allow sufficient time to develop the pressure field. Wait approximately five minutes before recording the pressure at the sensing holes close to the suction hole and longer for holes further away.
Step 10
Determine the effective radius of pressure field extension
Retrieve the highest recorded pressure from the natural environment and normal appliance depressurization in step 4. Compare this pressure with the pressure records at each of the sampling holes from step 9. The pressure sensing hole furthest from the suction hole that has a pressure equal to or greater than the highest pressure in step 4 is the pressure field extension effective radius.
The fill material underneath the slab is permeable if the radius of pressure field extension is larger than the furthest pressure sensing hole. This occurs when the pressure at the furthest pressure sensing hole is greater than the highest pressure from step 4.
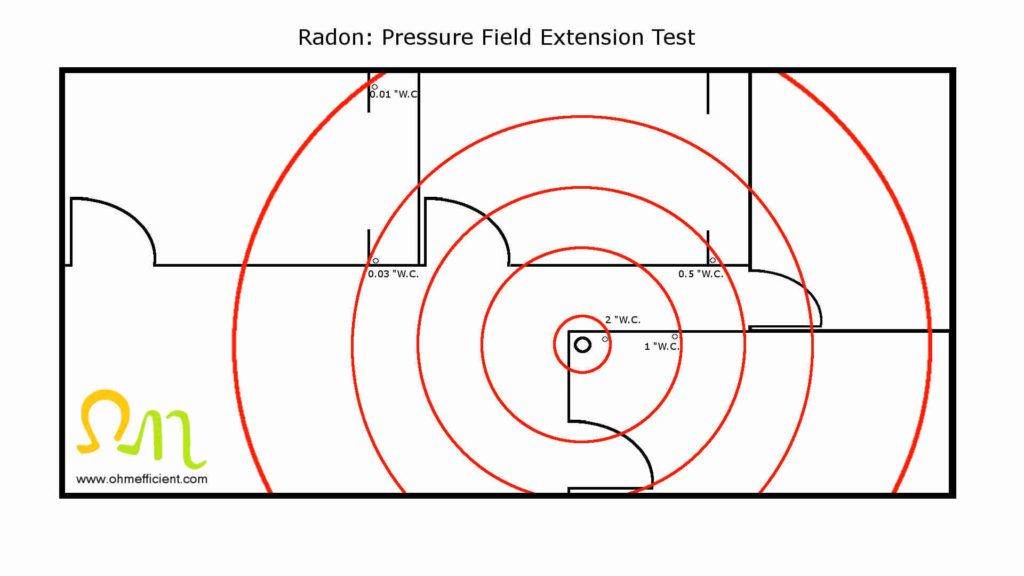
If the pressure at a sensing hole that is only 9 feet away from the suction hole is equal to the highest pressure in step 4, the pressure field extension effective radius is only 9 feet. This indicates that the fill material underneath the slab has low permeability. More suction holes would therefore be required to effectively mitigate radon from the building.
Pressure field extension test limitations
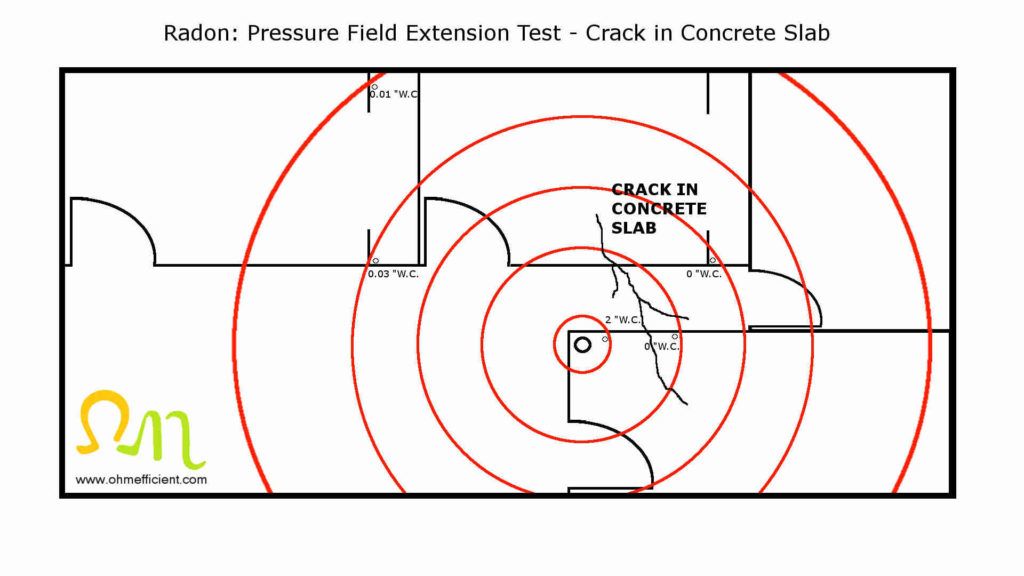
Large cracks in concrete slabs provide a path for indoor air to bypass the pressure field extension test. A crack between the suction hole and pressure sensing hole will not allow accurate pressure measurements beyond the crack.
Pressure and flow test
The pressure and flow test determines the permeability of the fill material under the slab. The test determines the effectiveness of how air flows underneath the slab after a radon mitigation fan installation. Comparing the results of the pressure and flow test with fan curve data helps to select the proper radon mitigation fan for the building.
The following steps explain how to perform the pressure and flow test to determine the permeability of the fill material.
Step 1
Measure the vacuum inlet flow and baseline scaling hole suction
With the portable commercial grade vacuum already inserted and sealed in the suction hole, insert and seal a hot wire anemometer into the vacuum inlet hose. Note: If you do not want to puncture a small hole in the vacuum cleaner hose, purchase a cheaper spare hose for this purpose.
The hot wire anemometer measures the speed of the air flowing into the vacuum. The electronic circuit in the hot wire anemometer maintains a constant temperature of the “hot wire” sensor. As air flows past the hot wire, the wire cools. This creates an imbalance of the resistive bridge and develops a voltage across it. The amplifier detects this voltage and adjusts the feedback current to increase the hot wire temperature, which re-balances the resistive bridge. The amount the amplifier needs to adjust the feedback current is therefore, proportional to the speed of air flowing past the hot wire.
The hot wire anemometer has a setting to enter in the vacuum hose diameter. Entering the vacuum hose diameter into the hot wire anemometer, allows for the anemometer to automatically calculate the air volume in CFM.


Next, insert and seal the tube from the micromanometer into a baseline scaling hole. Temporarily seal all pressure sensing holes with the duct sealing compound.
Step 2
Adjust vacuum speed to produce 1″W.C. at baseline scaling hole
Turn on and adjust the vacuum cleaner’s speed using the series connected rheostat until the suction pressure at the baseline scaling hole is 1”W.C. Record the baseline suction pressure and CFM flow into the vacuum cleaner.
Step 3
Continue recording flow rates at different suction pressures
Increase the vacuum cleaner speed to produce 2”W.C. at the baseline scaling hole and record the flow rate into the vacuum. Continue to increase the speed of the vacuum by 1”W.C. increments in suction pressure while recording flow rates. Continue to do this until a suction pressure of 5’”W.C. is reached.
Note
The DM1 micromanometer is a highly accurate manometer that works well for the pressure field extension test, however, the full scale range is 2.2″W.C. To record flow rates at higher suction pressures, a cheaper, less accurate manometer with a higher full scale range can be used.


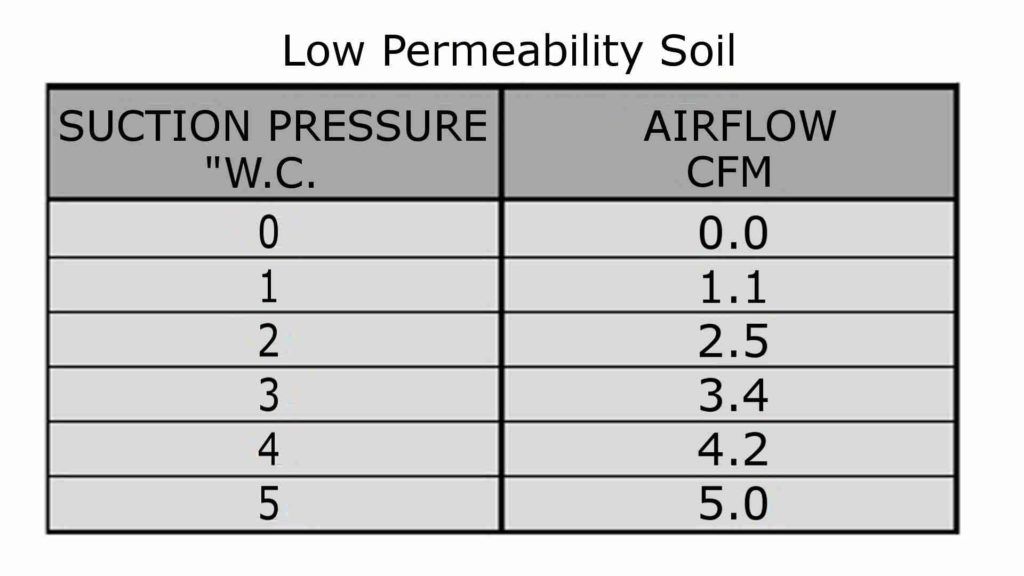
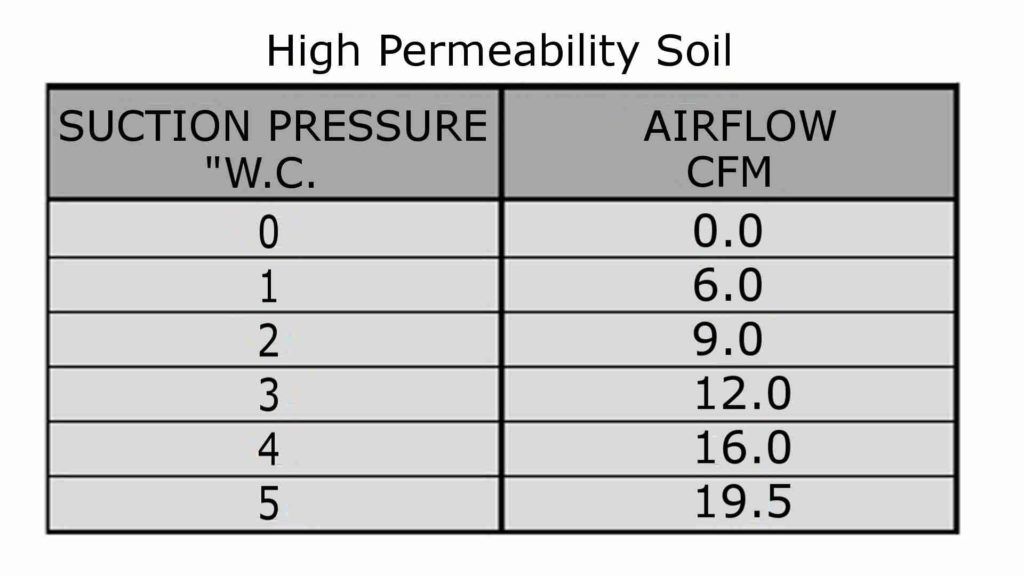
The following tables are examples of soil fill material under the building. Both are considered low permeability compared to gravel fill material.
Step 4
Plot the “W.C. suction pressure and CFM flow rate of the fill material data
Using the data gathered from the pressure and flow measurements, you can plot the flow curve of the fill material.
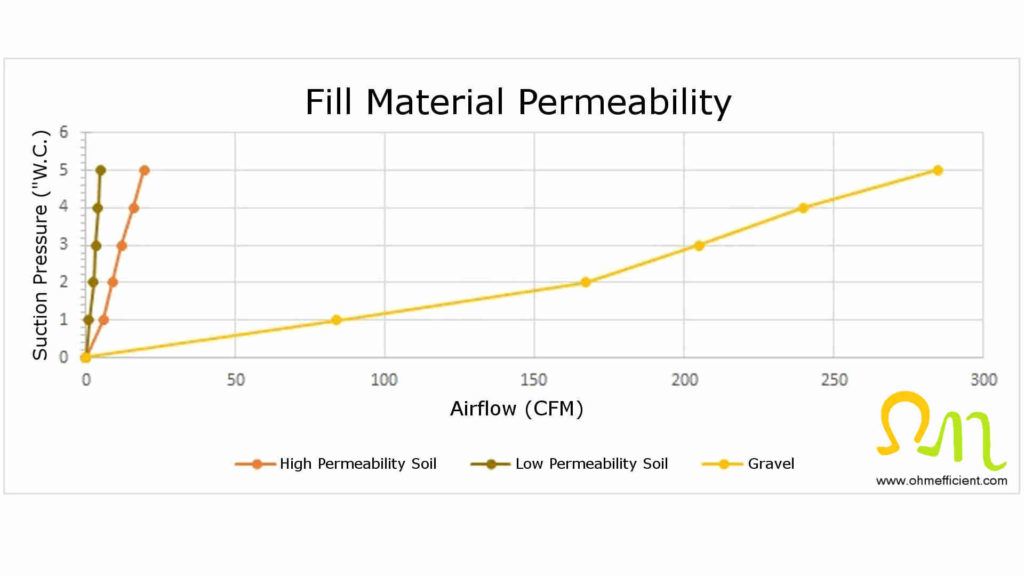
Radon fan selection
Fans are engineered and constructed to move air in different ways. Radial and centrifugal are the two main fan types. Radial fans move air radially with high flow and low pressure. Centrifugal fans turn the air 90o and are useful for moving air at lower flow rates and higher pressures. The orientation of the fan blade (forward curved, backward curved, backward inclined etc.) also changes the characteristics of the fan curve.
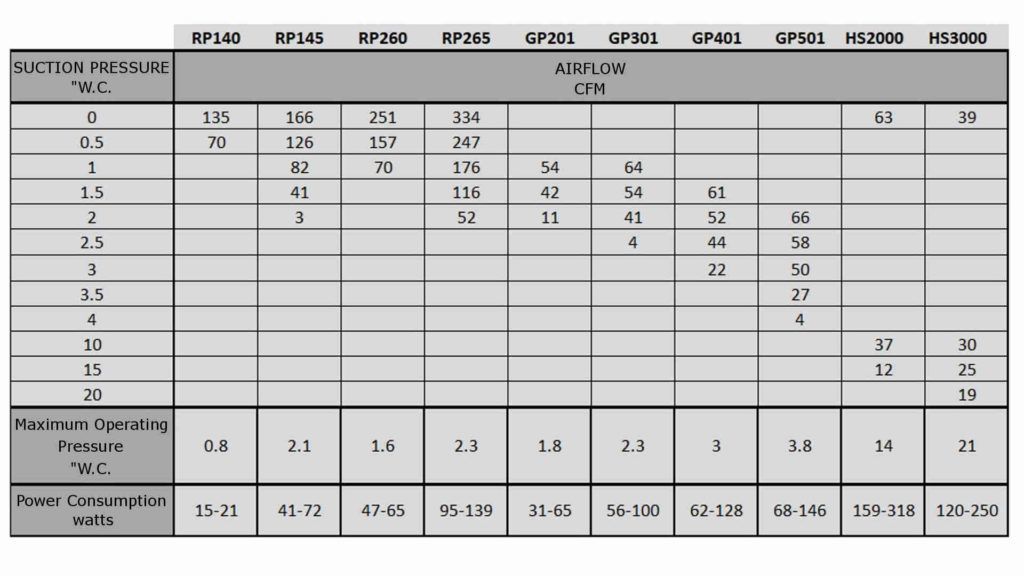
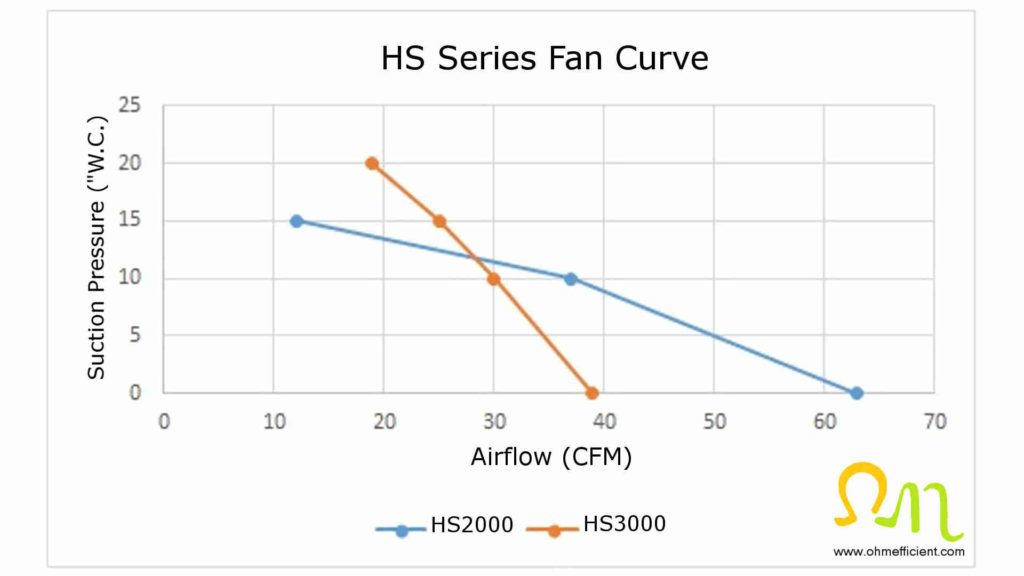
All fan types generally have higher airflow at low suction pressure and reduced airflow as suction pressure increases. Some fans are designed to move high volumes of air at low suction pressures. When these fans are installed on systems with higher suction pressures (i.e. low permeable soils), the airflow decreases rapidly. Other fans are designed with a lower peak airflow, however, they are engineered to have higher airflow in systems with higher suction pressures.
Below is a table of various radon mitigation fans types. The table shows fan performance values at varying suction pressures as well as maximum operating pressure and power consumption.
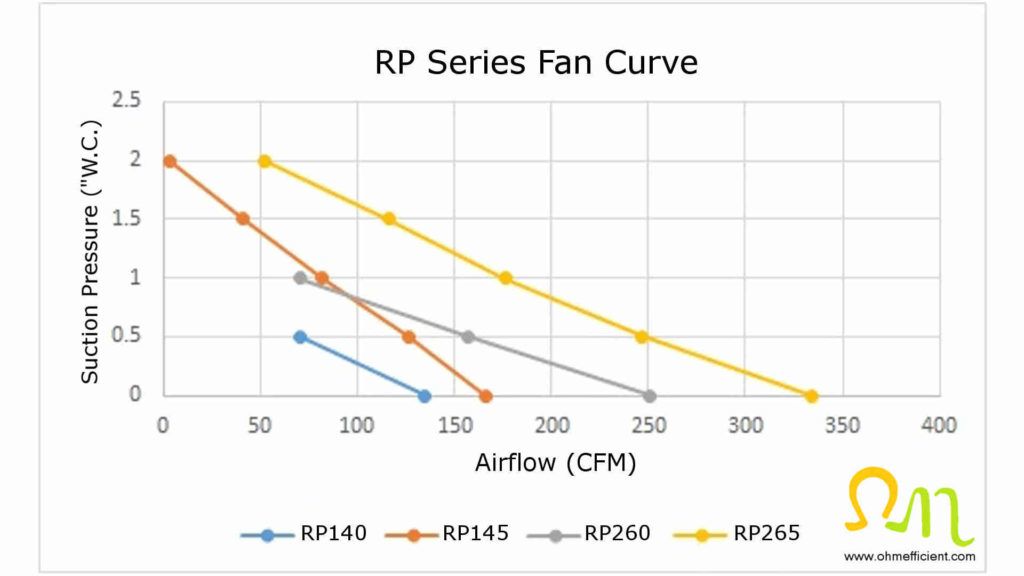
Radon fans with high airflow
The RadonAway RP series radon mitigation fan has high airflow at low suction pressures. The airflow decreases rapidly as the suction pressure increases. This series of radon mitigation fan works best with highly permeable fill material such as gravel. This fan is also appropriate for new homes that have radon piping installed under the slab.
The RP260 and RP265 models have higher peak airflow as the size of the impeller is larger than the 100 series fans. All of these fans have a recommendation of using either a 3 or 4 inch PVC pipe size for the suction and exhaust.


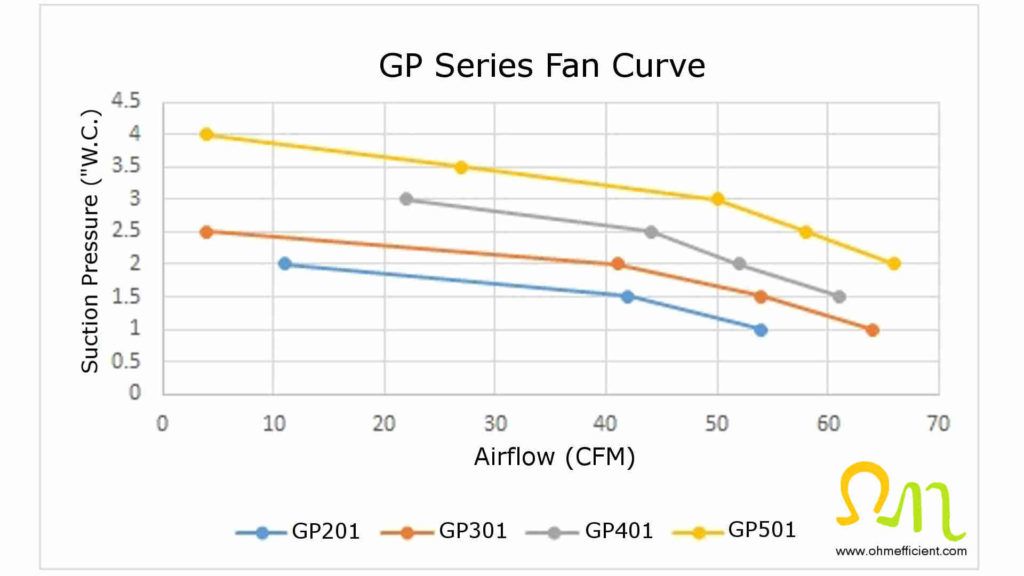
Radon fans with high suction pressure
The RadonAway GP series radon mitigation fan operates at higher suction pressures. This series of radon mitigation fan works best for moderate to low permeable fill material such as soil.


The RadonAway HS series radon mitigation fan operates at low airflow and high suction pressures. This series of radon mitigation fan works best with low permeable fill material such as clay, sand or compacted soil.
Selecting the correct radon fan
To mitigate radon effectively and efficiently, select a radon fan using the results from the pressure field extension and pressure and flow tests.
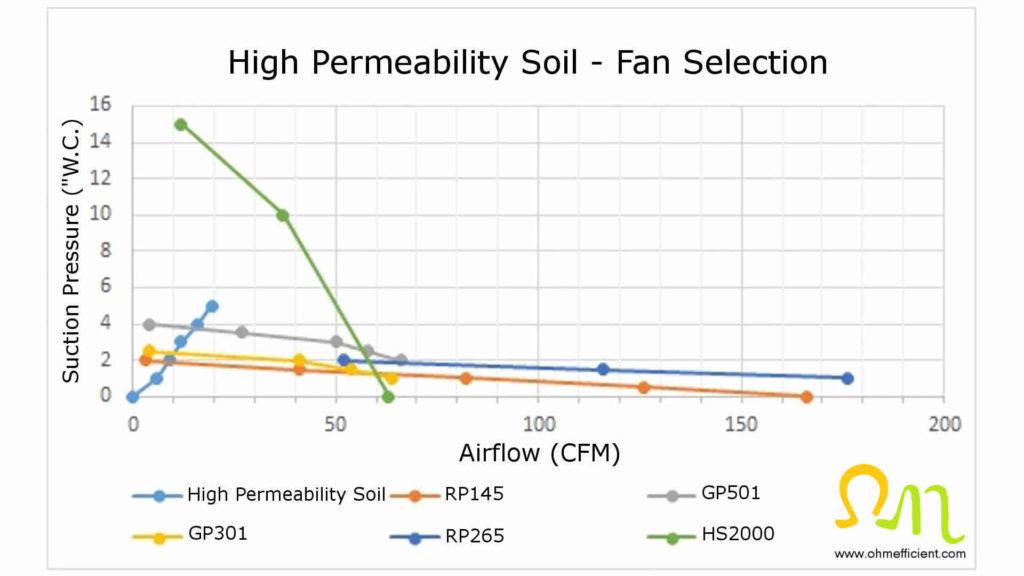
Plot the results of the pressure and flow test with a few of the fan curves from the table above. The point at which the fill material curve intersects with the fan curve is where the system would operate.
Note
Fans operate most efficiently near the middle of their characteristic curve. At this point, the airflow and suction pressure versus the fan power consumption are optimal. Operating a fan in this area also reduces the amount of noise the fan emits resulting in quieter operation. Operating the fan at a higher suction pressure above the midpoint results in increased power consumption, more noise as well as reduced efficiency.
From the fill material permeability and the fan curve plot above, three out of the five fan curves operate near the high suction, low flow end of the fan curves. The RP265 fan is not capable of producing enough suction pressure and is clearly not suitable for this application. The fill material curve does not extend past 5”W.C. suction pressure, however, this curve will intersect with the HS2000 fan curve. If desired, return to the pressure and flow test and continue recording values up to 15”W.C. The three remaining fan curves that intersect the soil permeability curve all intersect above the midpoint of the fan curve. This means that all of these fans would operate at a higher power consumption as well as at higher noise levels.
The radon mitigation fan that intersects the fill material curve at a higher suction and a higher airflow rate will generally be more effective. Therefore, selecting either the HS2000 or the GP501 fans would give desirable results for this fill material.
Determining radon PVC pipe size
RadonAway gives recommendations for the size of PVC pipe to install with their different series of radon mitigation fans. They suggest using a PVC pipe size of either 3 or 4 inches for the RP series fans and 3 inches for the GP series.
Deviating from these recommendations should only be considered when the airflow results from the pressure and flow test are considerably low. Increasing the PVC pipe size, reduces these air flow restrictions. Also, any time the direction of air changes, there is a resulting pressure that increases the restriction of the system. Choosing a route that limits the amount of elbows and directional changes of the PVC piping therefore minimizes these restrictions and allows for better airflow.
Determining suction hole size and the amount of fill material to remove
After the pressure field extension and pressure and flow tests are complete and the suction hole location(s) have been determined, the suction hole(s) need to be enlarged. These holes are typically enlarged using a 5″ masonry coring bit. Increasing the hole size allows access to excavate a pit underneath the concrete. Once the hole has a 5 inch diameter, use a small garden trowel and a 5 gallon pale to remove 10 to 20 gallons of fill material.
Depending on how compact the fill material is directly underneath the concrete determines how the pit should be excavated. If the fill material directly beneath the concrete is loose, a wide shallow hole is effective. If the fill material directly beneath the concrete is compact, digging a deeper hole with the hopes of reaching more permeable soil, is generally more effective.
Once the excavation of the suction pit is complete, reduce the suction hole to the size of PVC pipe. Use a 5 inch x 4 inch schedule 40 PVC reducer bushing to reduce the suction hole to four inches. Seal the suction hole to reducer bushing connection using a quality urethane caulk to prevent radon from entering the building. All other PVC fittings (pipe, coupling, elbows, etc.) need to be glued together using a PVC cement for sealing purposes.
Label radon mitigation systems
Labeling radon mitigation systems help ensure that people who are unfamiliar with the system do not tamper with it. Place radon labels on both the suction and exhaust PVC piping. Label the circuit breaker within the electrical panel that supplies power to the radon fan to ensure people do not inadvertently switch it off. Additionally, label the breaker that supplies power to the audible radon mitigation system alarm, if applicable.
How to connect and set up a radon system alarm
A radon mitigation system alarm monitors the functionality of the fan for active soil depressurization installations. These alarms do not measure the level of radon within a building, they only monitor the operation of the radon fan itself. These alarms are useful because after the radon fan installation, the fan runs continuously and will eventually fail. The fan will fail from either a mechanical issue, or a loss of electricity supply. Once this occurs, the radon mitigation system no longer works, which activates the alarm to notify the building occupants.
The radon mitigation system alarm monitors the differential pressure from beneath the slab and within the building. The air pressure beneath the slab is lower than the air pressure within the building. When this differential pressure exists, it means the system is operating correctly, and the radon mitigation system alarm is in its normal state. Once the radon fan fails, the air pressure re-balances, or potentially becomes lower within the building. At this state, the radon mitigation system alarm is active and a visual strobe light along with an audible alarm is sounding.
Radon mitigation system alarms are typically mounted on a wall near the radon fan vertical suction piping. The alarm kits include vinyl tubing and a plug-in style transformer to supply power to the alarm module. Typically, a 5/16 inch hole is drilled into the PVC suction piping 6 inches higher than where the alarm module is mounted. The vinyl tubing is inserted approximately one inch inside the PVC piping and then routed to the differential pressure connection of the alarm module. The plug-in style transformer simply plugs into a wall receptacle that is within 6 feet of the alarm module.


Electrical supply for radon fans and alarms
Ensure the wall receptacle used to power the radon mitigation system alarm is on a separate electrical circuit breaker than the radon fan. Test this by momentarily switching off the circuit breaker to the radon fan. If the radon mitigation system alarm sounds, then they are on separate electrical circuits. If the alarm does not activate, both the radon fan and alarm are on the same circuit, defeating the purpose of the alarming for electricity supply loss.
Radon U-tube manometer
Alternatively, a radon U-tube manometer can be installed on the vertical PVC suction piping. When the radon mitigation system is operating properly, the U-tube manometer will indicate a differential pressure. When the radon fan fails, there will be no differential pressure and the fluid within the U-tube manometer will indicate zero. The radon U-tube manometer provides the same functionality as the radon mitigation system alarm with the exception that the building occupants need to regularly verify that a differential pressure exists.


Parts and tools required
Radon Monitor (to monitor radon levels within a building)
Fan
Radon Accessories Installation Kit (for connecting fan to PVC piping and radon labels etc.)
Micromanometer (for pressure field extension test)
Digital Manometer (for pressure and flow test)
Portable Commercial Grade Vacuum
Speed Control for Vacuum
Hot Wire Anemometer (for pressure and flow test)
3/8″ Masonry Bit (for pressure and scaling holes)
2″ Masonry Coring Bit (for suction hole vacuum tests)
5″ Masonry Coring Bit (for suction hole excavation)
Hammer Drill (for coring suction holes)
Crack Sealant (to seal cracks in concrete slab)
Radon Mitigation System Alarm (visual and audible system monitor)
Radon U-tube Manometer (visual system monitor)
References
WHO Handbook on Indoor Radon: A Public Health Perspective (Geneva: WHO, 2009), http://whqibdoc.who.int/publications/2009/9789241547673_eng.pdf
Health Canada, Cross-Canada Survey of Radon Concentrations in Homes Final Report (Ottawa: HC, 2012), http://www.hc-sc.gc.ca/ewh-semt/pubs/radiation/survey-sondage/index-eng.php
American Cancer Society, Radon and Cancer (2015), https://www.cancer.org/cancer/cancer-causes/radiation-exposure/radon.html

