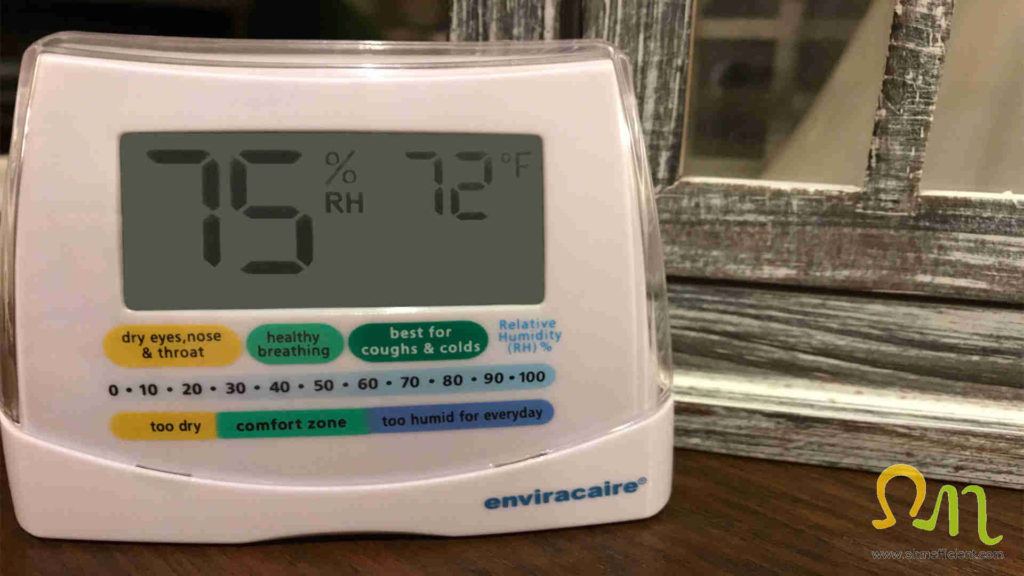
A Nest thermostat can be set up with a whole house dehumidifier to control relative humidity levels within the home. This article includes drawings and electrical wiring diagrams explaining how to set up and wire a Nest thermostat, whole house dehumidifier and air handler. The benefits of controlling your home’s relative humidity relating to comfort and energy savings will also be reviewed.
Dehumidifiers versus air conditioners
Both dehumidifiers and air conditioning systems dehumidify air. The primary purpose of an air conditioning system is to cool down the air supplied to the building. The added bonus is that while the air conditioner is operating it also removes moisture from the air. The sole purpose of a dehumidifier is to remove moisture from the air. Dehumidifiers are able to remove moisture from the air more efficiently compared to an air conditioning system. One of the major advantages with using a dehumidifier is that humidity levels can be controlled. If the humidity within the building rises above the Nest thermostat humidity setting, the dehumidifier turns on. The dehumidifier remains on until the humidity within the building reaches the Nest thermostat relative humidity setting.
Air conditioners cannot control the humidity levels within the building. The thermostat stops the air conditioner from operating when the desired temperature setting has been reached. If the humidity levels within the building remain high, no dehumidification will occur until the air conditioner turns on again. Decreasing the thermostat’s temperature to a lower value enables the air conditioner to continue cooling and dehumidifying. However, this may cool the building to a lower temperature than desirable at a cost of comfort and energy consumption.
How dehumidifiers and air conditioners dehumidify air
To understand how dehumidifiers and air conditioners dehumidify air, we need to understand how temperature, relative humidity and dew point correlate. Relative Humidity is defined as the percentage of water vapor present in the air, in relation to the amount needed for saturation at any given temperature. Dew point is defined as the temperature to which the air must be cooled to become saturated with water vapor. A psychrometric chart determines the dew point of air at varying temperatures and relative humidity levels. For example, air at 75oF and a relative humidity of 40% has a dew point of 49oF.
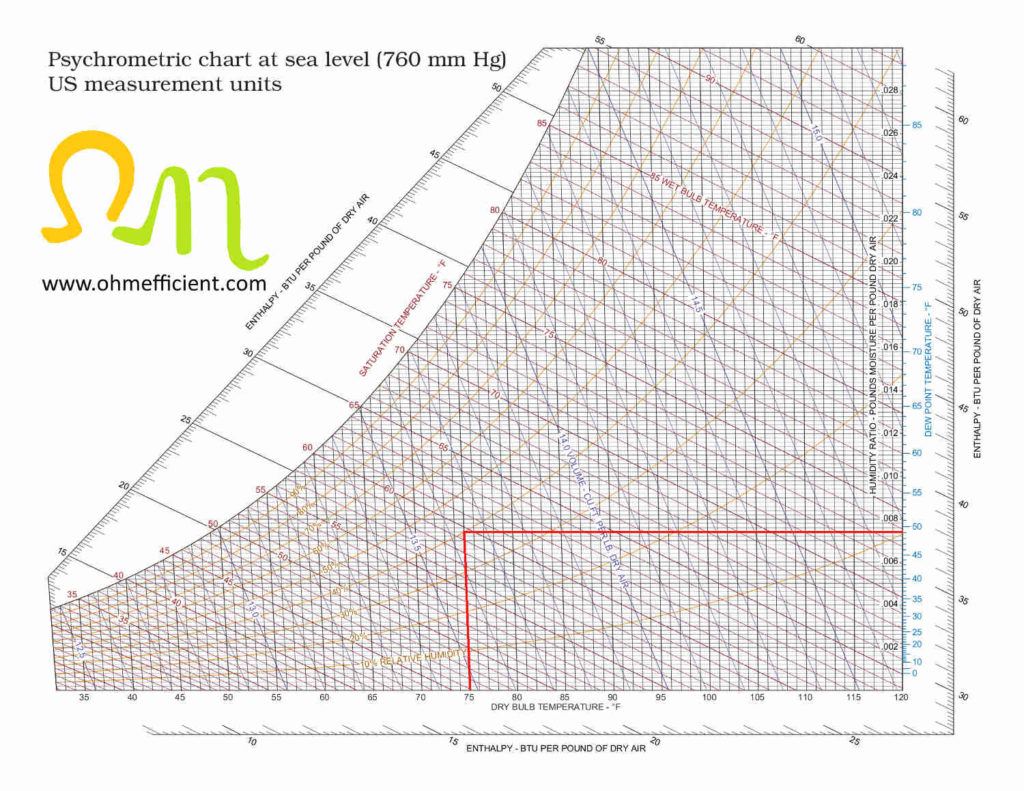
This is important to understand because dehumidifier and air conditioner evaporator coils typically operate at 40oF / 4oC. If the dew point temperature is higher than the evaporator coil temperature, moisture in the air will condense on the evaporator coil. This effectively dehumidifies the air as it passes through the dehumidifier or air conditioner. If the dew point temperature is lower than the evaporator coil temperature, moisture will remain in the air while it passes through the evaporator coil. This will not dehumidify the air as it passes through the dehumidifier or air conditioner.
How air conditioners work
To understand how air conditioners work, you need to understand how the refrigerant temperature, pressure and state (gas or liquid) changes throughout the closed looped system.
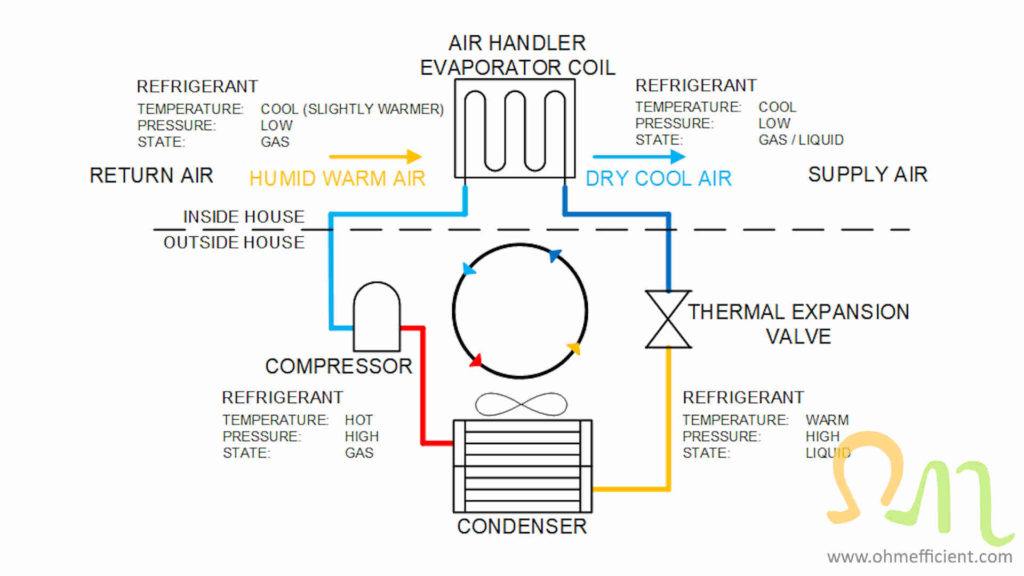
The refrigerant temperature that enters the air handler’s evaporator coil inside the building is cool. The pressure is low and the state of the refrigerant is a mixture of both liquid and gas. When warm air from the house passes through the evaporator coil, the remaining liquid of the refrigerant evaporates. The refrigerant changes from a mixed gas/liquid state to a pure gas state. As a result of the heat transfer from the warm air to the refrigerant, the refrigerant temperature becomes slightly warmer.
The refrigerant in its gaseous state now enters a compressor that is usually located outside within the condenser unit. This is where the refrigerant compresses from a low pressure to a high pressure gas. Compression generates heat and at this point the refrigerant is at its highest temperature within the system.
The refrigerant then enters the condenser, which works on the principle that heat transfers from warmer to cooler objects. The current refrigerant temperature is warmer than the outdoor air temperature. The outdoor air cools the refrigerant enough for the refrigerant to condense which subsequently changes its state from a gas to a liquid. The liquid refrigerant then passes through a thermal expansion valve, again, usually located within the condenser unit. The thermal expansion valve causes an immediate reduction in refrigerant pressure. This instant pressure drop changes both the refrigerants state and temperature. The refrigerants state changes from a liquid to a liquid/gas mixture. The refrigerant temperature drops, restarting the cycle within the closed loop system.
How dehumidifiers work
AprilAire Whole-House Dehumidifier
AprilAire Whole-House Dehumidifiers are designed and assembled in the USA using US and global components by AprilAire, the leader in Indoor Air Quality solutions for the home since 1954, and come with a 5-year warranty.
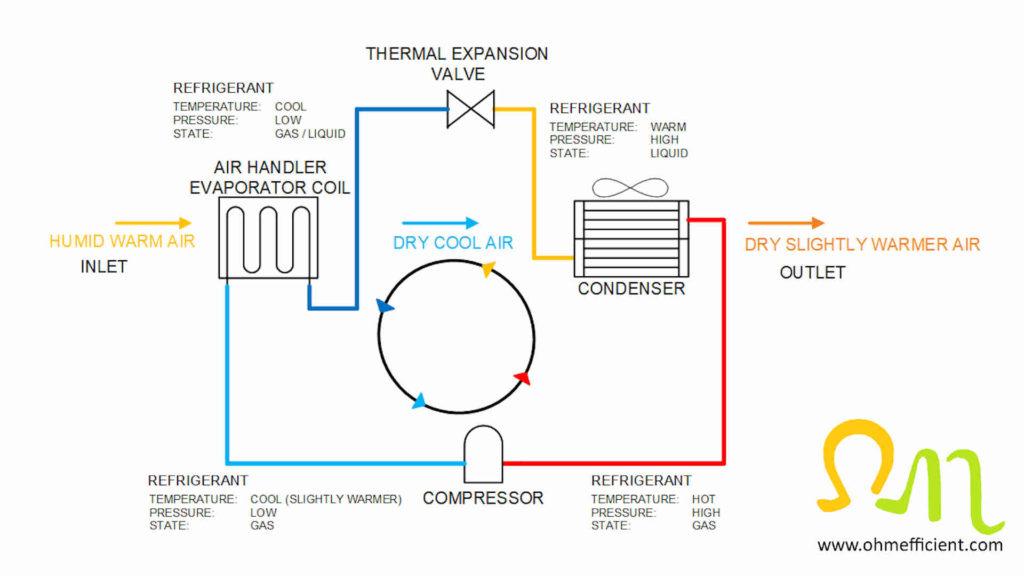
A dehumidifier works very similarly to that of an air conditioning system. The refrigerant temperature, pressure and state (gas or liquid) changes exactly the same way as it does in an air conditioning system. The major difference is that all of the dehumidifier components reside within the dehumidifier unit itself. Whereas air conditioning systems separate the compressor, condenser and thermal expansion valve from the evaporator coil.
When warm, humid air enters the dehumidifier it passes through the evaporator coil and becomes cool dry air. The air then routes through the dehumidifier’s condenser coil. The cool, dry air condenses the refrigerant from a gas to a liquid within the condenser (similar to how the outdoor air condenses the refrigerant in air conditioning systems). Heat transfers from the refrigerant in the condenser to the cool dry air. This results in a slightly warmer, but much drier air exiting the dehumidifier. A dehumidifier is therefore able to supply dry air that is not cool back through the homes air handler.
How the human body reacts to relative humidity
(why you may feel hot even when the room temperature is 75oF / 24oC)
The human body is continuously generating heat. Displacing this heat occurs from a combination of conduction, convection and evaporation processes. Conduction is a heat transfer that is proportional to the differential temperature of the human body and another object. Convection is a heat transfer via movement of air across the skin. Evaporation is a heat transfer from the conversion of a liquid to a gas.
Relative humidity affects the human body’s ability to displace heat via the evaporation process. To emphasize this, let’s look at two extreme examples of heat displacement from the evaporation process. When the relative humidity is 0%, the air is very dry and evaporates moisture from the human body easily. This evaporation process cools down the human body. When the relative humidity is 100%, the air is completely saturated and zero moisture evaporates from the human body. If the human body has no other heat transfer processes occurring, overheating will occur.
Heat index
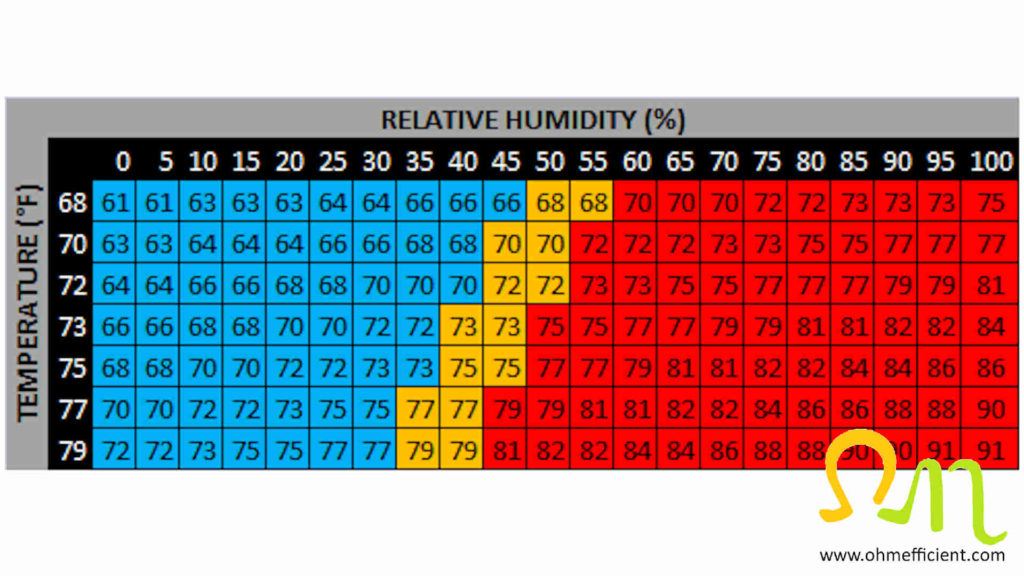
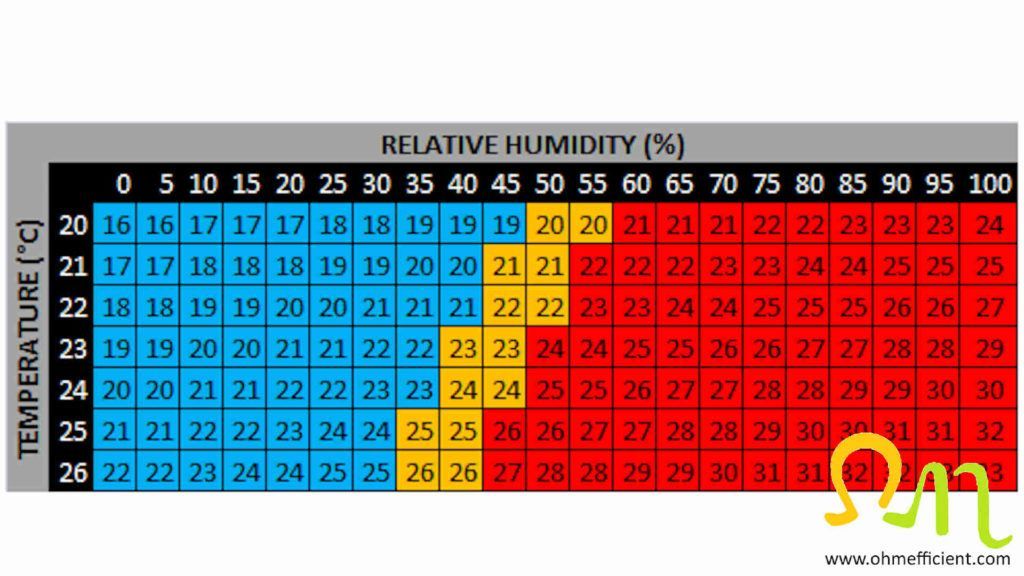
The heat index is a concept that refers to how cold or hot the human body feels at different temperatures and relative humidity levels. Refer to the heat index tables below: everything in blue feels cooler to the human body compared to the actual temperature. Everything in orange feels like the actual temperature. Everything in red feels warmer to the human body compared to the actual temperature.
Example
Air cooled to 75oF will feel like 75oF when the relative humidity level is between 40 and 45%. However, if the relative humidity in the building is 65%, the air will feel like 81oF. When the relative humidity is 65%, decreasing the thermostat setting 3oF to a setting of 72oF, will make the air feel like 75oF again.
Reasons to install a Nest Thermostat and dehumidifier
- To control humidity levels within the building.
- If an air conditioner is over sized for the building size. Over sized air conditioners meet cooling demands in short periods of time (5 to 15 minutes). Over sized air conditioners may not run long enough to dehumidify the air.
- If you live in humid areas, where running air conditioning alone does not meet the buildings humidity level requirements.
- If you live in an area where there is no need for air conditioning during the spring and fall due to cooler weather; however the humidity remains high.
If you plan on installing a dehumidifier, watch this installation video and read the instruction manual before proceeding.
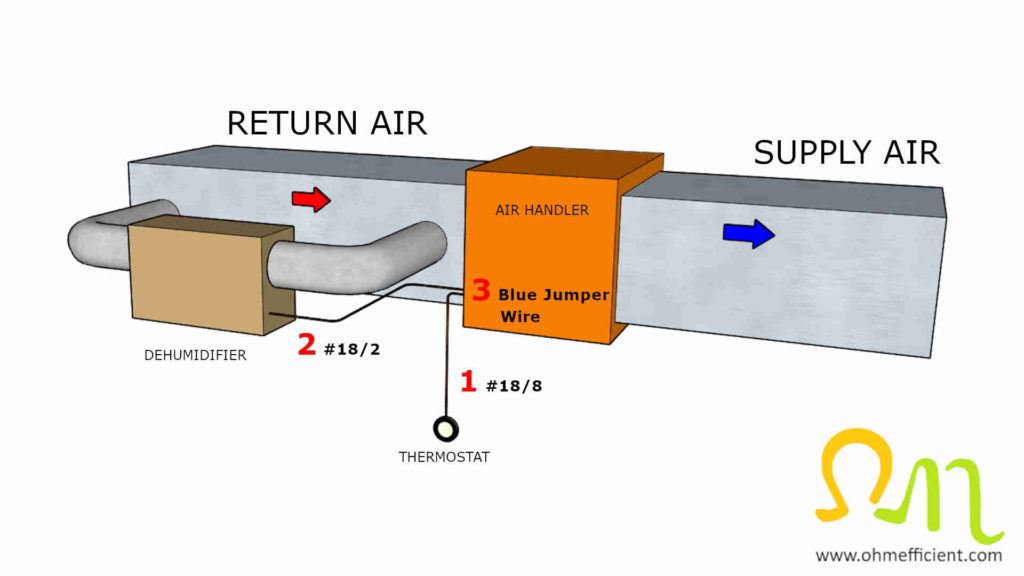
Dehumidifier return air to return air installation
This installation is ideal when the dehumidifier operates while the air conditioner is running. Use this configuration if you live in a very humid climate, where running air conditioning alone does not meet the buildings humidity level requirements.
Note
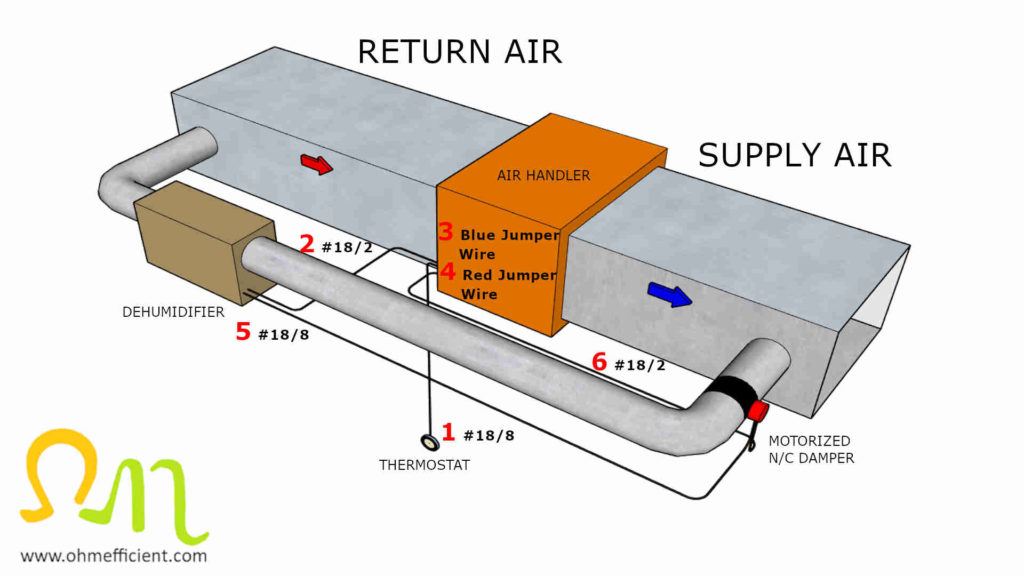
The red numbers in the dehumidifier return air to return air picture below are used to illustrate the wiring connections in the dehumidifier wiring diagram. The dehumidifier will need to have a drain line connected to the air handler’s drain. Additionally, place the dehumidifier in a drain pan when installing the dehumidifier within an attic space. The dehumidifier will also need access to a 120 volt outlet to supply power to operate the unit.
Dehumidifier return air to supply air installation
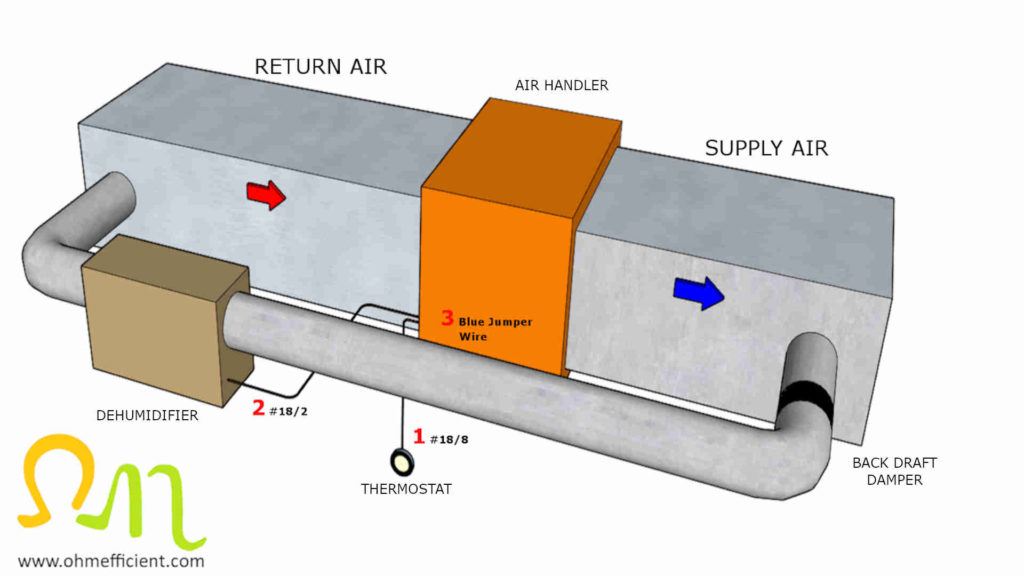
Most dehumidifiers should be installed in this configuration. This installation is ideal when the dehumidifier operates when the air conditioner does not. Additionally, this configuration is helpful when the building air conditioning unit is oversized; or if you live in an area where there is no need for air conditioning during the spring and fall. This configuration is preferable because dry air exiting the dehumidifier bypasses the air handler evaporator coil and flows directly into the building.
Conversely, installing the dehumidifier before the air handler, results in the dehumidified air immediately passing through the air handler evaporator coil. When dry air exiting the dehumidifier passes through the air handler evaporator coil, the moisture from the evaporator coil transfers to the dry air.
This configuration requires installation of either a backdraft damper or power damper. The purpose of these dampers is to prevent air from circulating back through the dehumidifier when the air handler is operating and the dehumidifier is not.
Note
The red numbers in the dehumidifier return air to supply air pictures below are used to illustrate the wiring connections in the dehumidifier wiring diagrams. The dehumidifier will need to have a drain line connected to the air handler’s drain. Additionally, place the dehumidifier in a drain pan when installing the dehumidifier within an attic space. The dehumidifier will also need access to a 120 volt outlet to supply power to operate the unit.
Wire Nest Thermostat to dehumidifier
Nest Learning Thermostat
Nest’s smartest, most advanced thermostat yet, the Nest Learning Thermostat (4th gen) is a beautiful, brilliant way to save energy, keep your home comfortable, and help make sure your heating and cooling systems are running smoothly.
Safety Note
Before proceeding with any wiring modifications, use a multi-meter and set it to VAC. Measure the voltage across the R and C terminals of the air handler terminal board. It should be approximately 24VAC. (Most air handler units have an interlock switch that opens when you access this area. Momentarily press in on this switch to measure the 24VAC). Then either turn off the supply breaker to the air handler located in the electrical panel, or turn off the maintenance switch located near the air handler. To be sure, no voltage remains, go back and measure the voltage across the R and C terminal. At this point, there should now be zero volts with the interlock switch is in either position. For safety reasons, never work on electrical equipment while it is live.
Thermostat Wire 18/8
50 feet of premium, CL2/R CMR Rated Brown thermostat wire 18/8. Thermostat cable is made from pure copper, and features solid 18 gauge copper conductors with a sunlight resistant outer jacket.
Control Relay
General purpose relay with a 24V coil. Suitable for switching circuits in various heating, ventilation, and air conditioning systems. It has four spade terminals for quick, reliable connections for single pole normally open switching capabilities.
Tools and equipment required
- Nest Learning Thermostat
- Whole House Dehumidifier
- SPST Control Relay
- Insulated Wire Crimps and Crimping Tool (required for SPST control relay)
- 18/8 Thermostat Wire
- Insulated Flex Duct
- Aluminum Foil Tape
- Back Draft Damper (only required for return air to supply air installations)
- Humidity and Temperature Smart Sensor (monitor your homes humidity and temperature from your phone)
- Multi-Meter
- Wire Stripper
- Sheet Metal Snips
- Adjustable Wrench
- Cut Resistant Safety Gloves
Warning!
If you are uncomfortable or do not completely understand the equipment or how to wire it, it is best to hire a professional for help. Wiring this equipment incorrectly may cause damage.
Nest Thermostat and dehumidifier control relay requirements
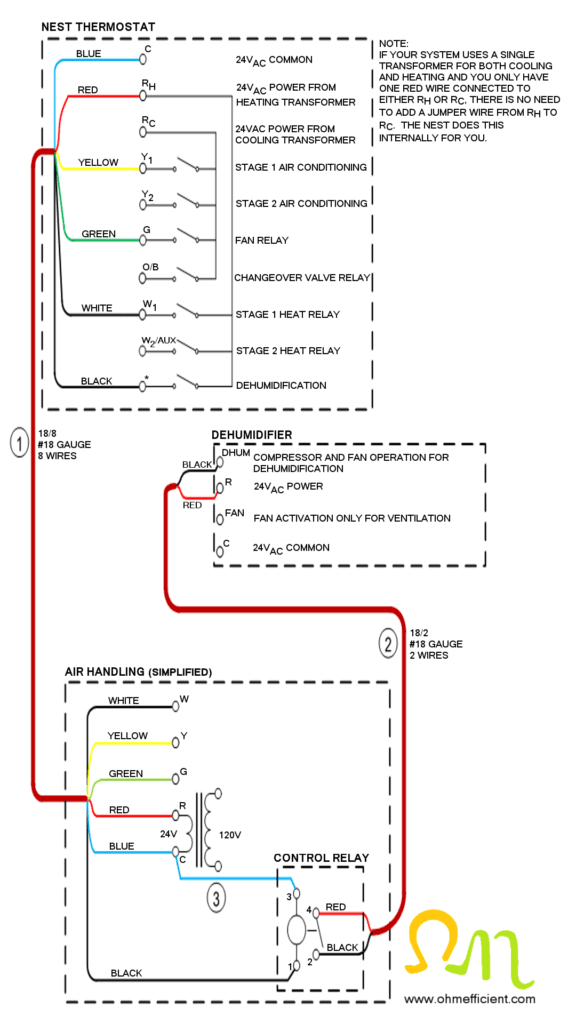
A Single Pole Normally Open (SPNO) relay is required for this dehumidifier application. The dehumidifier has a 120 volt plug to supply power to operate the fan and compressor. The plug also supplies power to an internal 120/24 volt transformer that supplies the dehumidifiers control voltage. The relay is used to isolate the dehumidifier and air handler 24VAC sources. If this relay is not used and the transformer in the air handler and the transformer in the dehumidifier are of different polarities (additive and subtractive) damage to the equipment will occur. When transformers that have opposite polarities are connected in parallel, a large circulating current occurs that will damage equipment and may cause a fire.
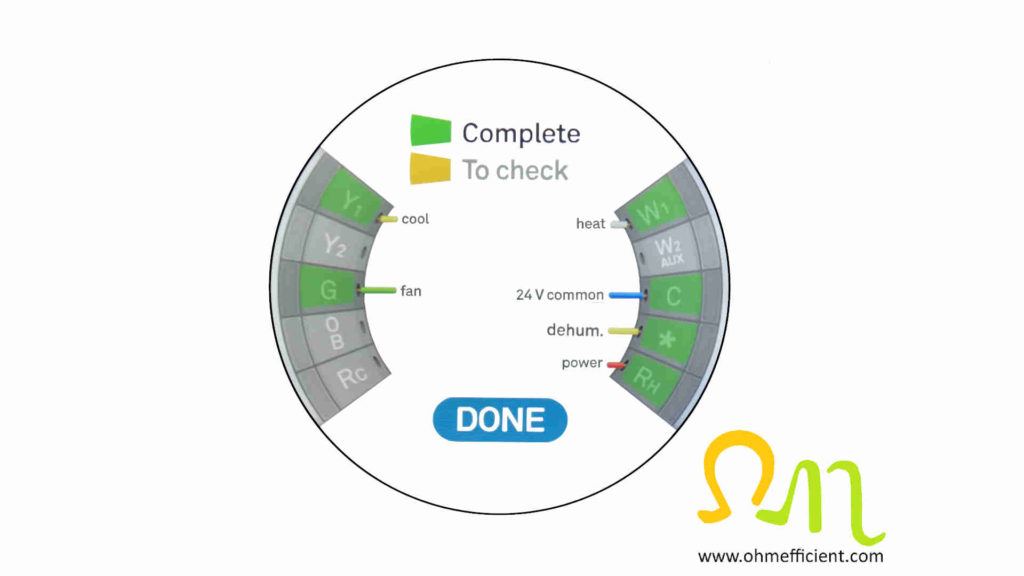
The thermostat black wire connecting to the Nest’s * connector, controls the operation of the dehumidifier. The black of the 18/8 thermostat wire connects to terminal 1 of the control relay mounted inside the air handler. A blue jumper wire connects terminal 3 of the control relay to the 24VAC common C terminal on the air handler terminal board. The black and red of the 18/2 thermostat wire connects terminals 2 and 4 of the control relay to terminals R and DHUM of the dehumidifier. When the home’s humidity is higher than the humidity setting, the Nest will close its “switch” and apply 24VAC to the control relay. The switch on the control relay will then close. This applies 24VAC from the dehumidifier R terminal to the dehumidifier DHUM terminal, which then starts the dehumidifier.
Wire Nest Thermostat to dehumidifier and motorized damper
Additionally, if there are concerns with too large of a pressure drop across a backdraft damper, a powered damper can alternatively be installed on the dehumidifier outlet. The powered damper is normally closed to prevent circulating air through the dehumidifier when the air handler is operating and the dehumidifier is not. When dehumidification is called for, 24VAC is applied to the damper motor which allows it to open. With the damper open the dehumidifier will operate with the air handler fan to dehumidify the air throughout the whole house. If the air conditioner is not keeping up with the Nest’s relative humidity setting the dehumidifier and air conditioner will operate simultaneously.
DPDT Control Relay
General purpose relay with a 24V coil. Suitable for switching circuits in various heating, ventilation, and air conditioning systems. It has spade terminals for quick, reliable connections for double-pole double-throw switching capabilities.
Tools and equipment required
- Nest Learning Thermostat
- Whole House Dehumidifier
- DPDT Control Relay
- Insulated Wire Crimps and Crimping Tool (required for DPDT control relay)
- 10 inch 24 Volt Motorized Normally Closed Damper
- 18/8 Thermostat Wire
- Insulated Flex Duct
- Aluminum Foil Tape
- Humidity and Temperature Smart Sensor (monitor your homes humidity and temperature from your phone)
- Multi-Meter
- Wire Stripper
- Sheet Metal Snips
- Adjustable Wrench
- Cut Resistant Safety Gloves
Warning!
If you are uncomfortable or do not completely understand the equipment or how to wire it, it is best to hire a professional for help. Wiring this equipment incorrectly may cause damage.
Nest Thermostat and dehumidifier with powered damper wiring requirements
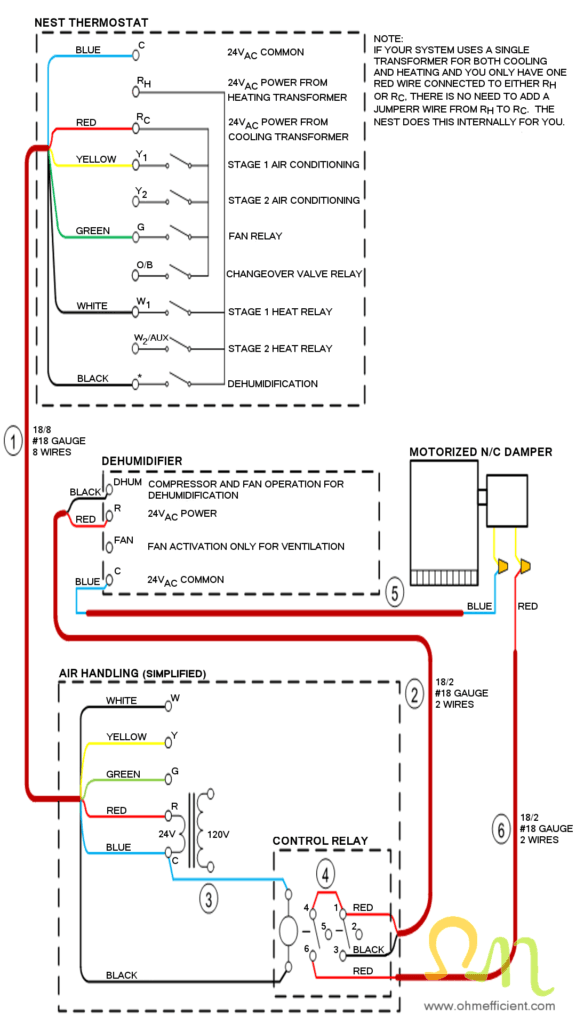
A Double Pole Double Throw (DPDT) relay is required for this dehumidifier application. The dehumidifier has a 120 volt plug to supply power to operate the fan and compressor. The plug also supplies power to an internal 120/24 volt transformer that supplies the dehumidifiers control voltage. The control relay is used to isolate the dehumidifier and air handler 24VAC sources. If this relay is not used and the transformer in the air handler and the transformer in the dehumidifier are of different polarities (additive and subtractive) damage to the equipment will occur. When transformers that have opposite polarities are connected in parallel, a large circulating current occurs that will damage equipment and may cause a fire.
Nest Thermostat and dehumidifier with powered damper operation
The thermostat black wire connecting to the Nest’s * connector, controls the operation of the dehumidifier. The black of the 18/8 thermostat wire connects to the coil of the control relay mounted inside the air handler. A blue jumper wire connects the coil of the control relay to the 24VAC common C terminal on the air handler terminal board. The black and red of the 18/2 thermostat wire connects terminals 1 and 3 of the control relay to terminals R and DHUM of the dehumidifier. A red jumper wire connects terminal 1 and 4 of the control relay. The red of another 18/2 thermostat wire connects terminal 6 of the control relay to the motorized normally closed damper. The Blue of another 18/8 thermostat wire connects the dehumidifier C terminal to the motorized normally closed damper.
When the building humidity is higher than the humidity setting, the Nest will close its “switch” and apply 24VAC to the control relay. The two switches on the control relay will then close. This applies 24VAC from the dehumidifier R terminal to the dehumidifier DHUM terminal, which then starts the dehumidifier. At the same time 24VAC from the dehumidifier R terminal is applied to the motorized normally closed damper. This will open the normally closed damper, allowing air to pass through.
Set up Nest Thermostat dehumidifier settings
The dehumidification settings on the Nest thermostat only show up once you have the wire connected to the * connection.
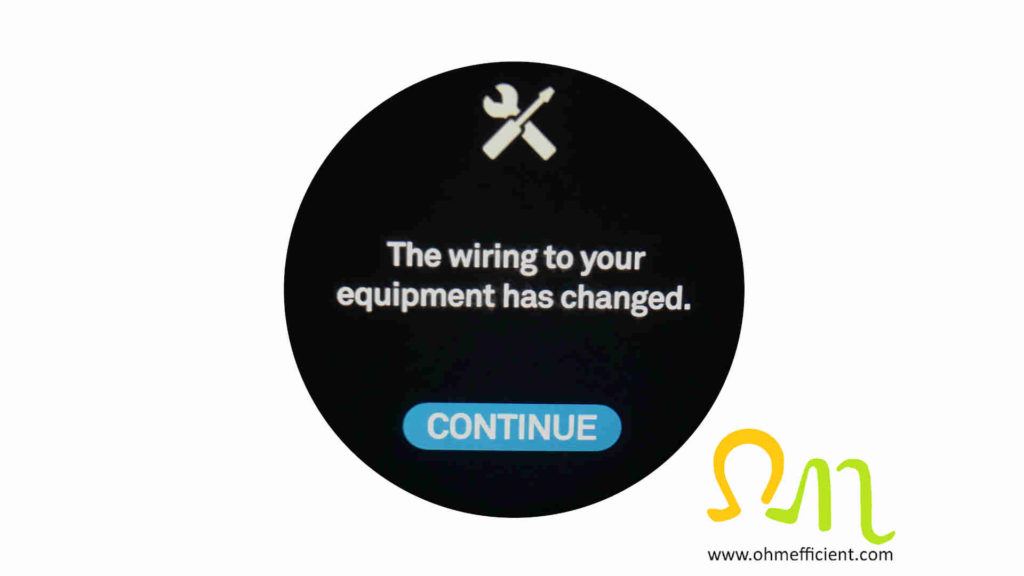
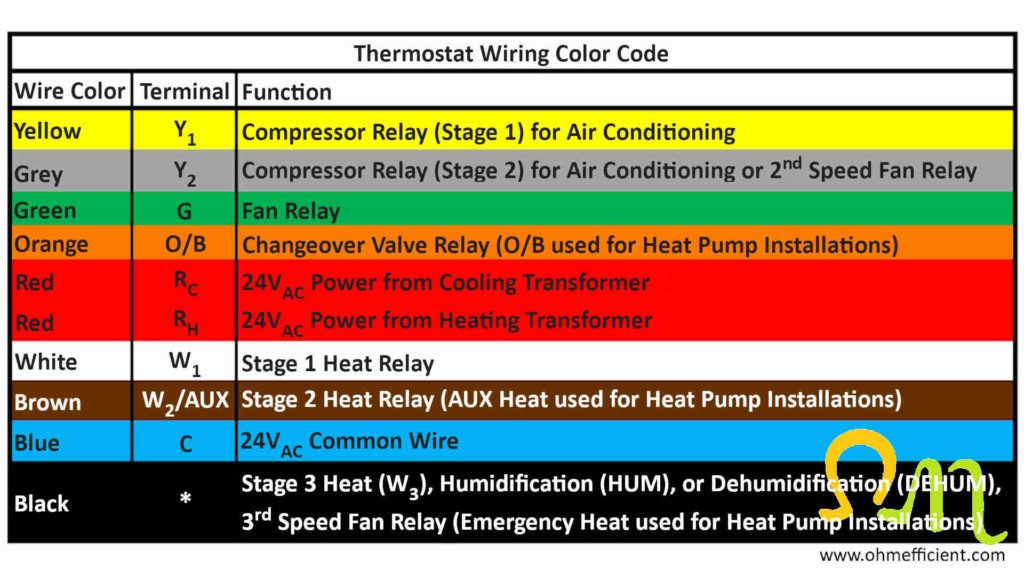
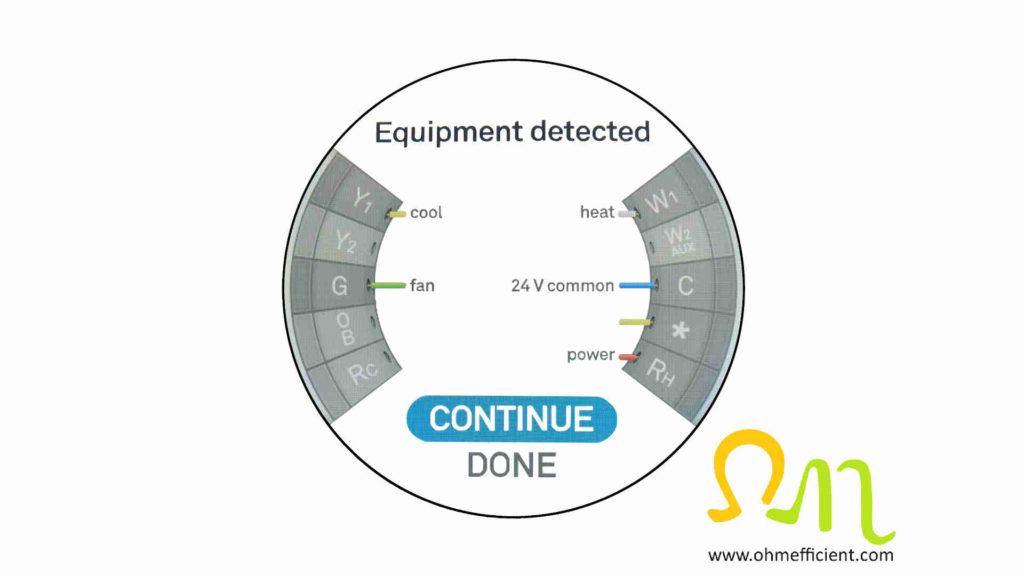
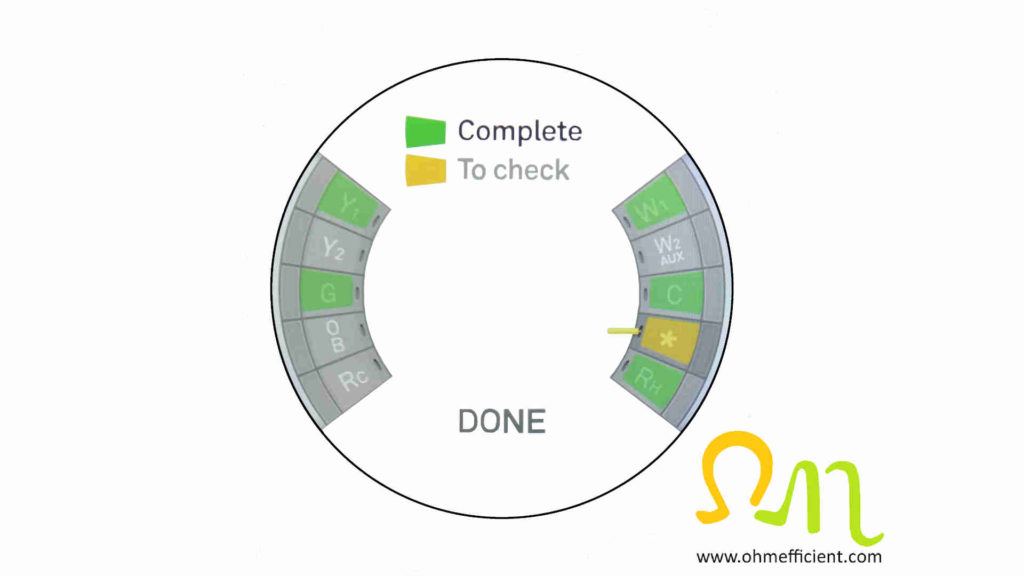
Notice that there is no label on the * connection wire. This is because the * connection can be set up to be either stage 3 heat, humidification, dehumidification, 3rd speed fan relay, or emergency heat for heat pump applications. Select “CONTINUE”
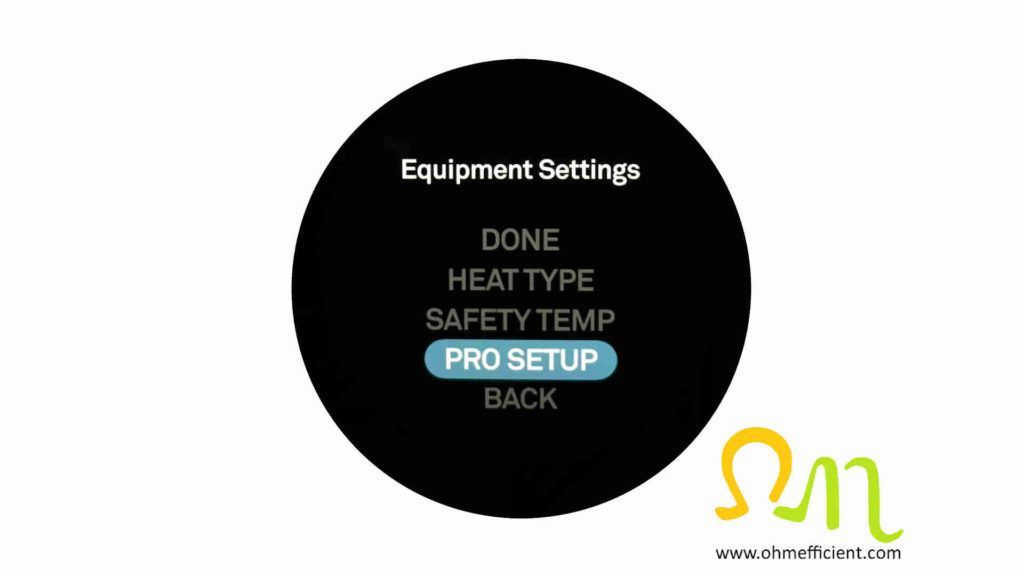
A statement will appear that states “Incorrect Pro settings will cause unexpected HVAC activity or equipment damage”. Turn and select “CONTINUE”
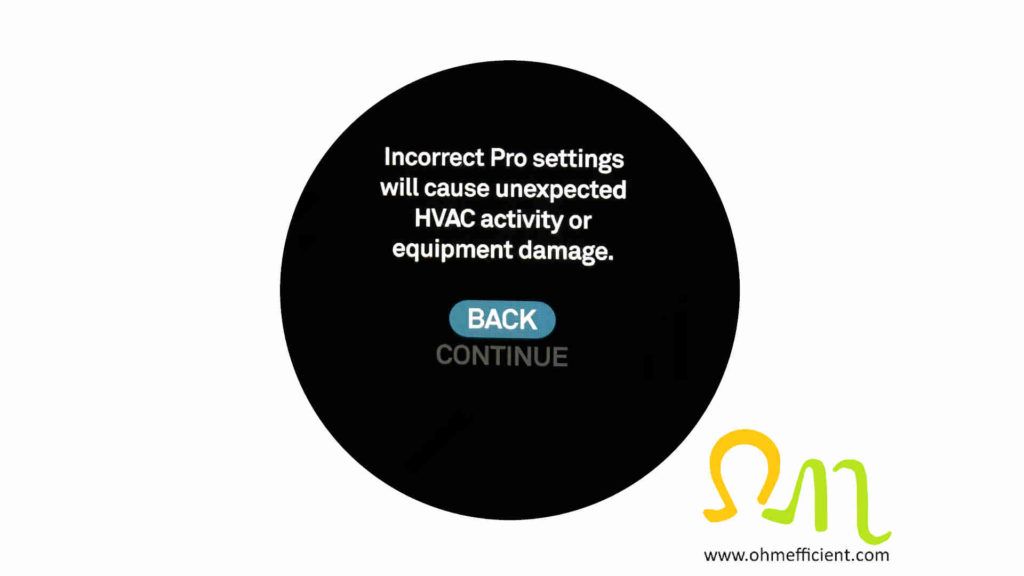
Turn to the * connection which is yellow (indicating that it needs to be checked) and then push on the Nest
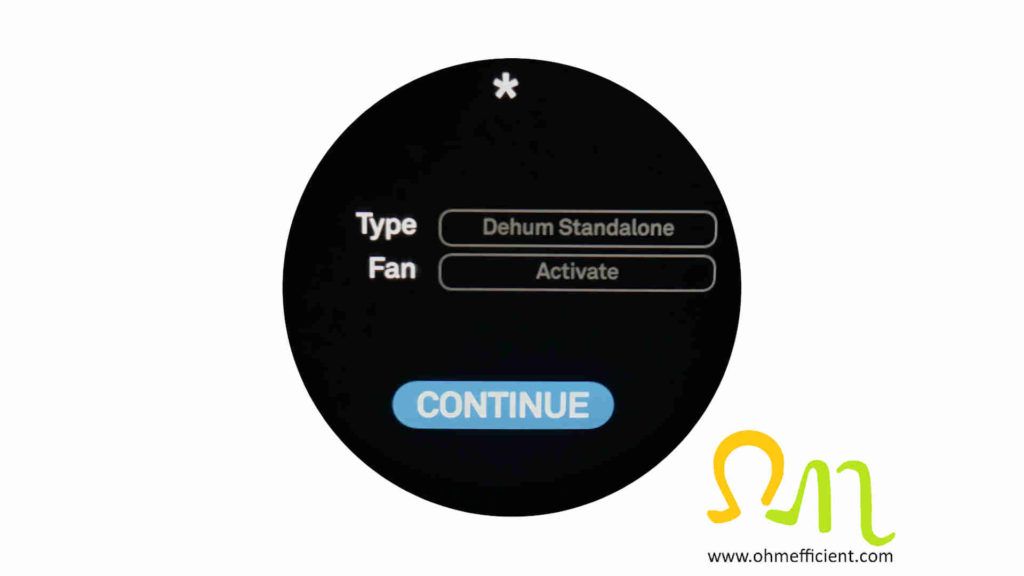
Select “Dehum Standalone” for Type.
Select “Activate” for Fan.
The * connection is now complete. Notice that it now shows up as dehum.
Go to Dehumidifier and select “SET HUMIDITY”
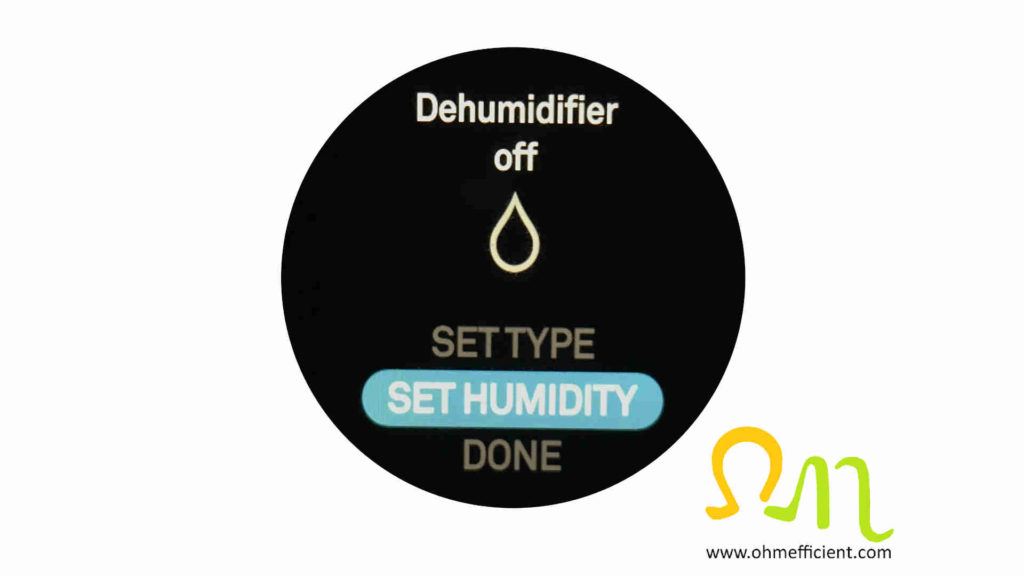
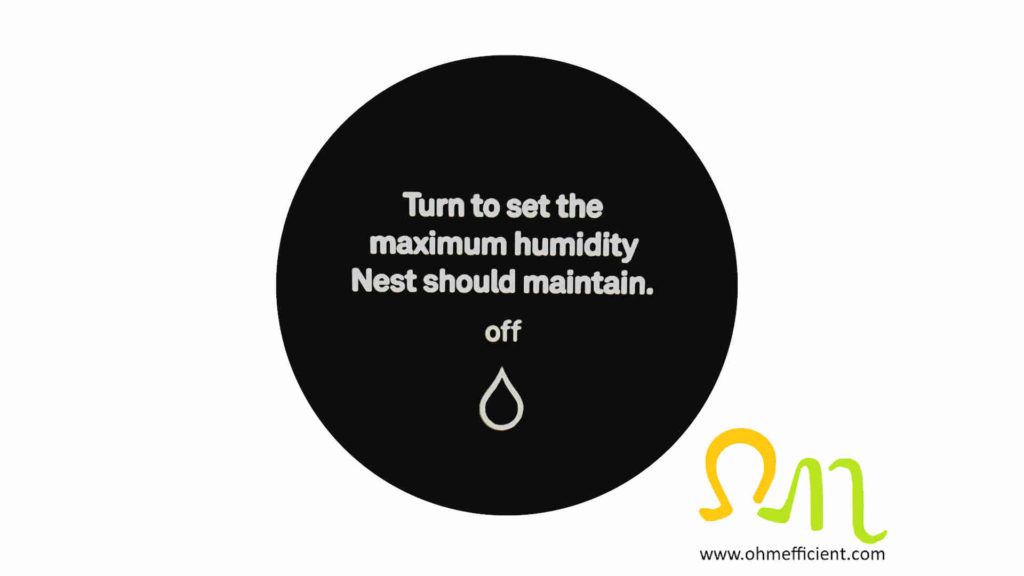
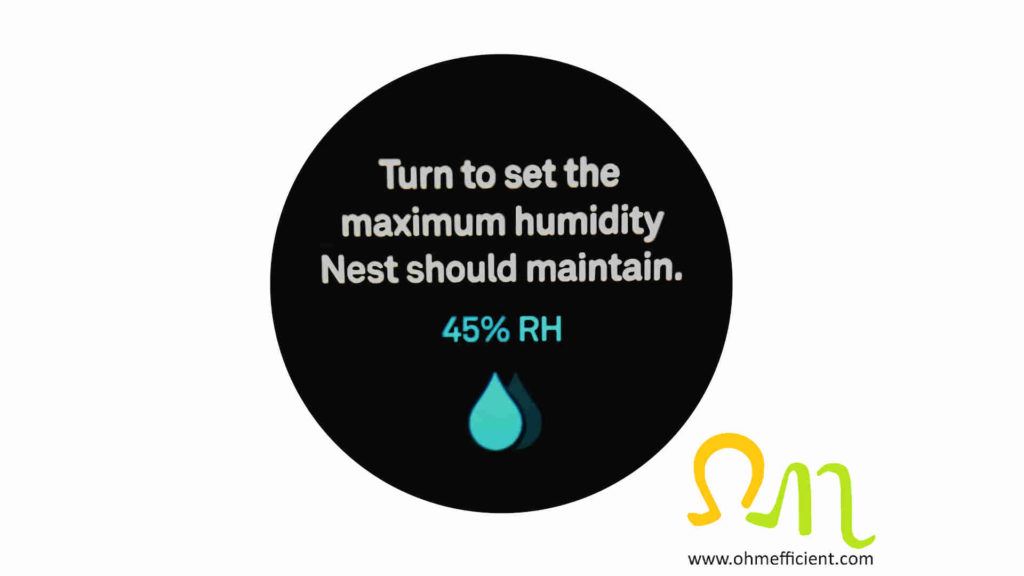
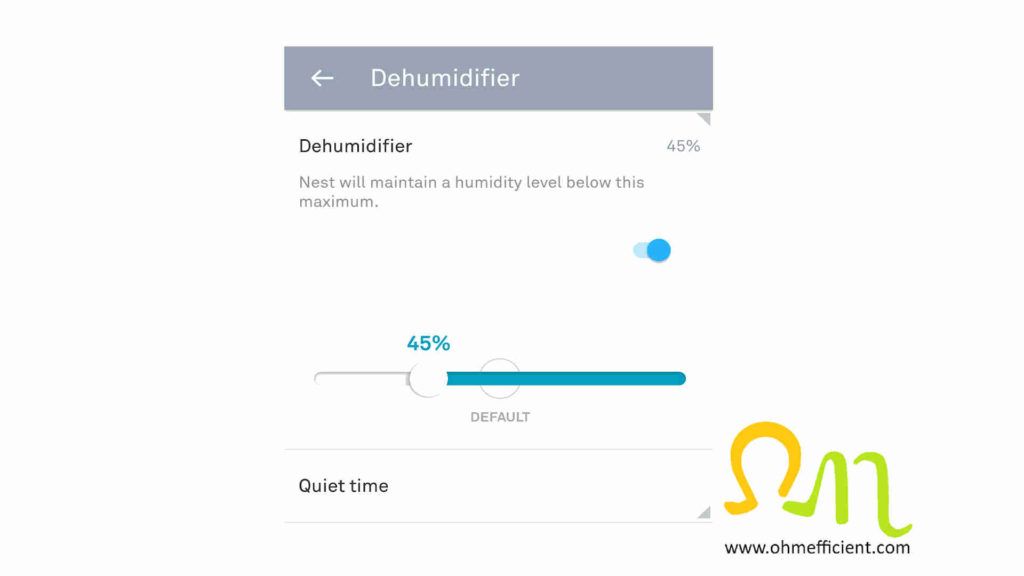
Turn to set the maximum humidity the Nest thermostat should maintain. An empty drop indicates off. The relative humidity is now under the Nests control, and can be set to the actual percent of relative humidity desired. Note: 30% relative humidity is the lowest maximum setting possible.
Setting humidity from the Nest Thermostat App
Energy savings from controlling relative humidity
Let’s look at the energy savings from the example in the “How the human body reacts to relative humidity” section above. In this example, you could decrease the temperature by 3oF / 2oC and still feel comfortable by controlling relative humidity. The U.S. Department of Energy’s Energy Saver Guide states, “You can save as much as 10% per year on heating and cooling by turning your thermostat down 7 to 10oF for 8 hours a day in the fall and winter; turn it up in the spring and summer” [1]. Referencing this Energy Savings Guide, we can then recalculate the energy savings for this example. As a result of increasing the temperature by 3oF / 2oC 24 hours a day, an energy savings of 9% can be achieved.
Conclusion
Integrating a dehumidifier with your home air handler system is the only way to control relative humidity within your home. Buildings with high relative humidity levels are uncomfortable as a result of ineffective cooling via the evaporation process. Controlling relative humidity will make your home more comfortable as well as more energy efficient.
After installing a dehumidifier, use a humidity & temperature smart sensor to monitor and trend the homes comfort levels. Place the sensor(s) anywhere throughout the home while using the smart phone app to view current and historical temperature and relative humidity levels.
Humidity & Temperature Smart Sensor
SensorPush is always monitoring and recording temperature, humidity, dew point, and VPD, ready to alert you when you’re in Bluetooth range, or even from afar with the G1 WiFi Gateway.
Related content
Duct Sealing Improves HVAC System Efficiency
How to Connect & Setup a Nest Thermostat to Function as a Humidistat
References
[1] U.S. Department of Energy 2017 Energy Saver Guide: Tips on Saving Money and Energy in Your Home (English) (available at https://www.energy.gov/energysaver/downloads/energy-saver-guide)

